Friday, July 29, 2011

SHARING SOME OF THE THINGS I LOVE!

Today I thought I would write about some of the things I love!  I don't know if this will be of as much interest to others as it is to me, but I am just in a mood today to think about "feel goody" things and I thought I would start with this picture to the right.  I just heard that coffee is one of the four best foods to prevent Alzheimer's.  Now, for me...that was VERY good news!  I love lattes, especially cafe' ole', and with that we had some yummy cookies, peanut butter to be exact.  Now that is comfort food!  To go along with this favorite, another thing (or things) that I love are my girlfriends!  We can never have too many of those.  Most of us do "just wanna have fun" and joining me on this coffee date were two of my friends, Marilyn and April. I am the Marilyn on the right! 

I would love to feature all of the beautiful women in my life, and I will feature them from time to time because they all have awesome talents and things to share. Marilyn and April both happen to be soloist singers and also have hearts the size of Texas!  They haven't sang together yet, but I believe that just could happen some day.  What an awesome performance that would be!  OK, another thing I love is my Studio.  The same day this picture was taken, we took a picture of me sitting in the midst of my "Creative Mess".

See those little ladies on the shelf above my head? I love making dolls...I have been paid for making them in the past, but they are just something I like to do for fun.  As I create the patterns and piece them together, they each become like a little person with their own personality!  Of course if one ever spoke to me...I would freak....well, you know.  Lol.  I love my computer...for obvious reasons...as I am on it right now!  It has become all about the small things in life for me.  Each day is a blessing and I want to live it to the full!
I love my puppy dog, Tucker.  He is a furry little bundle of Love and he constantly makes me smile and laugh with the little things that he does.  He loves to play "fetch", but his problem is that he can't stand to let go of the ball.  It just goes against his grain!  I finally learned to get several of whatever he is fetching, and I don't run out of things to throw.

Look at that smile!  He has control over his toy at the moment!

Here are a couple of my fairy dolls.  Some I sell, some I keep.

Of course there are lots more things that I love......my family, ice cream, rhubarb pie, all the fresh vegetables that we get in the summer, watermelon, kitty cats, picnics, barbeque's, I am beginning to notice a food theme here.  I guess I just LOVE food! 
So, as I am recuperating from some surgery I recently had, I haven't been creating a lot of new projects.  I hope you have enjoyed our little one-sided visit today.  I plan to bring lots more new projects in the near future.
Until then, enjoy your day!  "Live, Laugh, Love".  Celebrate family and friends.  They are the only things in life that cannot be replaced!

Happy Crafting!
Marilyn

This little tack with a hook will hold up to 3 lbs. in dry wall and up to 5 lbs in soft wood.  They will be coming to local stores in the near future....until then, they can be purchased on the website link you will find above.

Oh, and I LOVE CraZy TACKz!


Thursday, July 28, 2011

IRIS PAPER FOLDING....(Compared to the iris of the eye...not the flower)

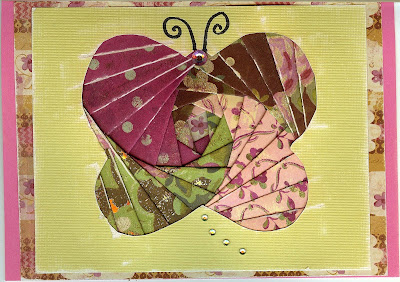
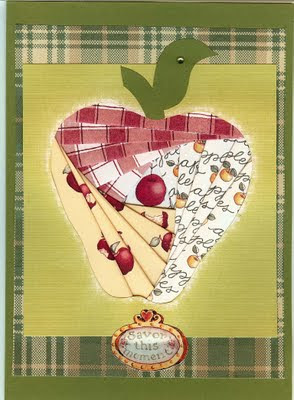
IRIS FOLDING....Have you heard of it?  Apparently the art form has been around for a long time, but I didn't really know about it up until a few years ago.  As I was going through my archives again today, I found these pictures of the cards I created when I got good enough at it to make some of my own patterns.  I am a total right brainer...anything that has numbers on it kind of freaks me out at first, even if you don't have to add or subtract them!  I found this to be a very fun way to challenge myself to some new things.  (at least new to me!)  I do not plan on giving you complete instructions on how to do this today.  I would suggest going on the Internet and then Google Iris Paper Folding.  You will get plenty of sites that show you patterns and technique if you would like to try this for yourself.  Each design is like a little surprise at the end because you don't get to really see it until it is done and you turn it over.  I will share some more cards that I made.....they may inspire you to try this for yourself!
This is a simple crown.  I had patterns for other iconic cultural symbols, but didn't get too many done after this one.  I was going to do a guitar and the popular angel's wings with the heart in the middle.  Following are some more of my inspired cards!


I have a friend, Karla Dornacher, who is a wonderful artist and author.  I used some of her attractive memory papers to complete some of these designs.  The stickers on the card are from Karla.  She has a Blog that you might want to check out.  If you Google Karla's name, you will find all kinds of links to her and her work.  I am certain of that, and that you will enjoy her work and heart!  Yes, I said "heart".  She has a beautiful heart!

Cute little snail, huh?  Again, some of Karla's papers and sticker.


This little cross was a good design to start out with.  It only used two papers to create the design.  The less paper designs you work with, the easier it is to do.


And for my grand finale.....this card features a little frame in the middle.  I left the "IRIS" large enough to frame a little picture.  At the time I could only find this pic of my daughter and her friend.  I didn't ask her about posting it..she may not appreciate it, but "oh, well".  We have certain "mom" rights, right??  That will do it for today.  I will be bringing some BRAND NEW designs in the near future.  I have been having fun going through my older creations and sharing them on the blog.  I hope you get some inspiration.  Again, I am always happy to share more instruction and information if you send me a note.  I am happy to help you be a success as you work on your projects.

While you are checking out Iris Folding online.....take a peek at CraZy TACKz at www.crazytackz.com .  They are a brand new product that is just starting to show up in stores.  There are MANY creative uses for this handy little "tack with a hook" and you can check out lots of the ideas on past posts right here on this blog.  There will be many new ideas coming!

Until next time,

Happy Crafting,
Marilyn
also found on Facebook


Wednesday, July 27, 2011

Party like a Pirate! A girly pirate, that is!

Party on with the Pirates!  How about a little girl-y pirate fun?  I have been bringing you a series of designs made with simple unfinished wood bases i.e. frames and boxes, easily found at your local craft store.  The Pirate decor is made using the craft sticks and Woodsie shapes that I have been featuring in several of my past Blogs.  These little Pirate Babes are pieced together as follows:  The "bones" are made by gluing two circles to each end of a jumbo craft stick.  Use a spring action clothespin to hold them in place until the glue dries.  The head is a jumbo circle, painted with shading on the sides of the skull to make it look more "gaunt" like a skull should look!  The pirate's bandanna is made by gluing the round ends of two small ovals to one side of a larger oval.  Glue a tiny circle to the top to make it look like a knot.
Refer to the photos given to glue the pieces together.  I used different sized craft sticks and circles to create smaller "cross bones".  Here is a larger view of the projects shown.
Since we are on the "girly" projects, I thought I would show you some more!
All of these projects are made using the same basic supplies.  I start by deciding on my designs, then gluing the wood pieces together.  Next, I paint them with acrylic paint.  *Unless it is better to paint the individual pieces before they are glued together.  I have been known to paint in the wrong place when I try to get it all done too fast. I glued rhinestones to the eyes for some extra "glitz". Here are the next grouping of projects I want to show you.
These are my "Uptown Girl" designs.  Notice a theme again!  I do love themes!  Here I have chosen a clay pot and an unfinished wood frame mirror as some simple bases.  Upon examination I am certain you can pick out the different shapes I used to create these little projects.  As always though, I am happy to share more instruction with you if you will send me a note and ask.  I want you to have success!  Here is another view:
An unfinished wooden purse was used here....little cosmetic items were glued to the top.  See the little compact sitting at the base of the mirror?  It is the place card for each person that comes to the party.  Just different sized circles painted and glued together.  A permanent marker was used to write the name on the faux mirror.  Here is one last view:

Fun, huh?  I love girly things and always looked for things to create out of when I was growing up.  It is amazing what you can find to use if there is no craft store near by.  In fact, in the 50's, we didn't even have a craft store as we know them now!  We are so lucky to have all of the wonderful creative supplies that are available for us to create with!
If you have not checked out the past posts where I featured designs using these Woodsie shapes...you might want to check them out.  They will give a better overview of the products to use and the supplies to have on hand if you want to make some projects.
That is enough Girly stuff for today!  I want to talk a little bit about CraZy TACKz...a BRAND NEW product that is just beginning to appear in stores.
I have shown design ideas in the Blogs that mention CraZy TACKz and I am working on a new design that I will feature on here in the near future.  Stay tuned for more....there is a lot more to share!

HAPPY CRAFTING!
Marilyn


Tuesday, July 26, 2011

Under the Sea - come and Craft with me!

 
 Under the sea....under the sea.......  The little diddy from The Little Mermaid movie is going through my head as I add the pictures to today's blog.  Again, I am showing some fun projects where I used basic wooden shapes called "Woodsies" by Forster to create my projects.  I also used a few other items to use as a base for my designs.  The Woodsie's come in jumbo sizes of the hearts, circles, teardrop, oval and star shapes.  I like to use these jumbo sizes along with the regular sizes of these shapes.  Some basic supplies to have on hand would be a utility scissors for cutting the wood pieces, wood glue (or craft glue), spring action clothes pins (to hold pieces together while the glue is drying), Acrylic Paint, Paintbrushes, water bucket, paper towels, paper plates and some toothpicks.  I used a large canning jar with a regular lid, smaller jars with wire closure lids, wooden treasure box, paper bag, home made bath salts and 3 ply jute string.  Oh! And a extra fine point black permanent marker.  Sharpie makes a good one.
Here is a close-up view of the bath salts.  The mermaid has a spring-action clothespin glued to the back of her and is being used as a closure for the gift bag.  Again, as always, if you would like further instruction on a project I have shown, please don't hesitate to send me a note and ask.  I would be glad to help you have success with your project.
Here is a broader view of the seven items that were completed.  As I have shown in earlier posts, I love designing with themes.  I am thinking about decorations and favors for a birthday party here.  Each girl gets to take home a jar of Bath Salts. (How about you change the mermaid into a Pirate if you are having a party for boys.)  You can find a recipe online for many different kinds of bath salts or scrubs.  The paper gift bag has a mermaid closure that also makes a nice party favor.  The little Treasure Chest is a fun decoration and the larger jar could be filled with some little treasures or with candy.  Fun, huh?
Here is one more nice close-up of the Treasure Chest.  I think we had some REAL money in there.  Nice gold coins.  I bet if I look, they are not in the chest anymore.  Probly' not in the bank either.....hhhhmmmmmm.

I can't leave my daily post without talking a little about those CraZy little TACKz "with a Hook"!  We are coming out with Phase II of the CraZy TACKz.  There should be a picture of the colored shapes that are coming on the Facebook link or on the website.. www.crazytackz.com .  Until then, I discovered that the original (clear) tackz can be painted, decorated with glitter, spray painted where the hook is colored too, or pushed into the wall, holding a die-cut shape behind the tackz to decorate the wall.  They are so-so simple to use directly in the wall, or you can make one of the Home Dec Projects I have shown on earlier blogs.  I have a brand new design coming in the near future.  I don't know if anyone noticed, but I have been gone for almost a week because I had some surgery!  Everything is all good now and I am able to get back to doing the things that I love.  So, that is all for today, I will bring you some new projects in the coming days.

Happy Crafting,
Marilyn


Monday, July 18, 2011

Join me on a Jungle Journey.....wild designs for today!

Hello!  I thought I would take us on a little trek through the jungle today with some more designs from days gone by.  I have created these designs with very basic supplies from the craft store.  The clay pot and wood picture frame are inexpensive base items to build your design on.  The little jungle critters are made from Forster Woodsie shapes and craft sticks.  As I have shown in some earlier posts, if you like puzzles, it is fun to put these basic shapes together to create cute little characters.  In this case, jungle animals!  The clay pot was given a base coat of acrylic paint, then I used a decoupage medium and applied tissue paper to the pot.  I wadded up the tissue paper, then smoothed it out and tore it into strips.  Then, applied the ModgePodge decoupage medium to the pot, adhered the tissue paper and applied another coat over that, until the pot was totally covered with the tissue paper design.
Pictured above is a door hanger, picture frame, and a little clay pot perfect for a party favor!  Do you notice the shiny surface?  After the acrylic paint dries, I like to apply a dimensional medium called Dimensional Magic by Plaid.  There are other products out there now that are similar, so you might ask the person in charge of that area at the craft store.
This is a wooden box that I painted then applied the tissue paper to the lid.  You can see the animals and the tree and the shapes I used to create them.  The tree is made from a craft stick and an unfinished flower cut-out that I found in the wood isle of the craft store.
I love creating around a theme.  Here is another view of the wooden box, a plant poke made from craft sticks, candle holders and another clay pot.
Years ago I designed several books using these little wood shapes.  I have always had a lot of fun creating with them and maybe you will too.  As always, I am happy to share more instruction if you would  like some!  Just send me a note and I will get back to you!
I will leave you today with a pic of the project I will bring next time.  We will go under the sea with a little Mermaid themed vignette.
Isn't she cute?  I will show you more on the next visit.  Hope these designs have given you some inspiration and you are enjoying your summer!

Happy Crafting,
Marilyn

Sunday, July 17, 2011

A little Christmas in July!

Hello!  Ok, true to my word in a previous Blog, I am bringing you a little bit of Christmas in July!  This is a very common thing in the Craft Industry because publications work 6 months out ahead of the current month.  This being July, many are thinking about Christmas and what they will be bringing you then!  Also, for professional crafters, work needs to start way before November because that is the month that all of the craft shows and boutiques start up for the Holidays!  So, I am bringing you several ideas that I have found in my archives to maybe inspire you early! Pictured is an angel made out of chenille stems (aka pipe cleaners),
pre-cut net tulle circles, some ribbon, memory paper scraps for face, crown and shoes, a crown paper punch,  loopy yellow yarn (hair), permanent marker, glitter glue, scissors, craft glue or low melt glue gun.
The "banner" the angel is holding was made on the computer, cut out and glued to a second piece of card stock to make a 1/8" border around the banner. For the angel wings, I found some chipboard die cuts of butterflies.  One of these butterflies made nice angel wings!  Wings can be cut from card stock if you don't have any of the die cuts.

Pictured next are some snowman snow globe cards that I made a year or two ago.  I love dimensional cards and I thought these would be fun to share.
Mr. & Mrs. Snowman
This is one card featuring the frosty couple.
This frosty fella is wondering what happened to his broom!
Here is another view of a Tulle Angel.  They were very easy and fun to make.  I don't always provide a lot of instruction on this blog, but I always want you to know that if you would like some more, just send me a note!  I will be happy to respond and help you  be successful!
Last, but not least, are a couple of angels that I made by punching out different sized hearts from different papers.  I rolled them around a pencil, then overlapped and glued the edges.  Again, I love using memory papers and cardstock to make dimensional projects.  It is a challenge and makes for hours of creativity and fun. Light Tan cardstock was cut into rectangles to make the legs, body and neck.  The head, hands and shoes were made from hearts, but trimmed to the appropriate shape.  I will be sharing some more themed designs using this concept as time goes on.

That about covers Christmas in July.  I must admit it is a little difficult to think about Christmas when Summer is really just getting started!  Somehow most of us are ready for it when the seasons change and the excitement for the Holiday builds!  Enough Christmas for today, though!

Remember how in past Blogs I have posted designs using a new little patented invention called CraZy TACKz?  Well, today is no different and I want to make sure you all know about this handy little "Tack with a Hook"!
Here is a project to give you at least one idea about how you can use these convenient tackz. They will hold up to 3 lbs. in sheet rock walls.
The TACKz were pushed into the bottom of the decorative wall hanging and it was then used to hang jewelry on!  Make sure you are pushing the tackz into a fairly soft surface...sheet rock, soft wood, bulletin board, etc.

Hope you had fun checking out today's projects.  I will be bringing lots more fun designs.  If you think of a cool way to use the CraZy TACKz, let us know!  We are on Facebook and Inventor/CEO, Gordie Murphy will be happy you stopped by to say "Hello".

Happy Crafting!
Marilyn


Saturday, July 16, 2011

Here comes the Bride...and lots more!

Hello! This is the time of year for lots of weddings.  As I was perusing through past designs, I came across a series of greeting cards that I made out of memory papers.  I started with a basic head and body shape.  The arms appear to be separate, but they are actually part of the card base (one piece) that is under the dress and in front of the veil.  Two flesh colored pieces of card stock are adhered together at the head, and the card folds open at the neck.  I made a pattern for the dress and veil and created the headpiece and bouquet using my flower punches and some beads cut apart from a bead pearl strand.  The dress is glued down to the "body" that is under the dress.  Isn't this fun?
Once I create a card "concept" I like to see what other cards can be made in a similar way.  I went in search of some more pictures, and these are what I came up with. This is the basic card.  I thought she should have some pretty outfits, so I created a...............see below........

Little closet for her....It has a few surprises inside when you open it up.  She fits inside this little amoire too.....so she can be sent in the mail!  Open the closet and see all her choices!


This is the amoire card before her wardrobe was added!

She chose her outfit and here she is, ready for whatever awaits her!
A message can be added to the inside of the card.  The card will open up at her feet.  Her clothes have a fold at the shoulders...and fit over her head, finishing the front and the back of the card.  Dimension can be added by shading around the edges with chalks and a cotton swab. 

**As always, if you see a design and would like a little more instruction..send me a note and I will be happy to respond!

I have lots more design ideas to share, so be sure to come back!  I post everyday and will bring lots more ideas from my archives!    Now, I want to mention a new little product that has become near and dear to me!  It is a very useful little tack with a hook called CraZy TACKz.  This brand new product has a US Patent and even though you might think you have seen one of these, you haven't!  You can read about them at www.crazytackz.com and they are also on Facebook.  They will be coming to a store near you, but for now they will sell them to Retail customers on the website.  I will close today with a photo of a CraZy TACKz project to show you another example of how to use them for a useful Home Dec piece.  This project is one of my favorites.


That is all for today, it is always fun sharing Creativity! 

Happy Crafting!

Marilyn