Monday, September 5, 2016

Spooky House Holiday Decor made with Smoothfoam!

                                                           
BOO!      


Quietly, stealthily, this thing was creeping up on everyone!  The people were all enjoying the sunshine and warm summer nights, and SUDDENLY; Boo!  There it was!  FALL!  (Boo-hoo.)

That's the way it happens.  The nights start getting shorter, the leaves are turning yellow and orange and before you know it all the little trick-or-treaters' are at your door!  It is never too soon for a little preparation. Some fun decorations are always great for getting everyone in the mood for Fall and Halloween.

Here's what you will need for the haunted house:

Smoothfoam:  12" x 1" sheet; 2
12" Cardstock: Black and orange
Hot Wire Foam Cutter (Marvy)
Die Cut Machine
Dies:  Haunted House; Scary Trees; Bat
Chipboard Sticker: Ghost
Acrylic Paint:  Yellow
Inkpad:  Orange
Wedge Sponge
Paintbrush
Adhesives

*Optional:  Frame with 12" opening that will accomodate the 1" foam.


Hope you got some inspiration for Fall decorating!

Make sure to take time to enjoy the small blessings along the way; and,
Live Life with a Flourish!

Marilyn


Haunted House Halloween Decor


Conjure up cozy feelings of Fall!
 The turning leaves, a pot of stew simmering on the stove, stormy nights with a warm fire burning in the house, Trick-or-Treaters', candy corn; these are all the things we look forward to as Fall begins to set in. 


To make this haunted house, you will need the following:

Smoothfoam; 12 x 12" sheets:  2
Hot wire foam cutter
Pattern  (see attachment)
pencil
scissors
Acrylic paint:  Black
Paintbrush
Chalk Ink:  White
Wedge Sponge
Cardstock:  White and Orange
Black permanent marker
Chipboard ghost adhesion
6 black die-cut arrows
Adhesives:  tacky glue and low melt glue gun
Toothpicks

Instructions:

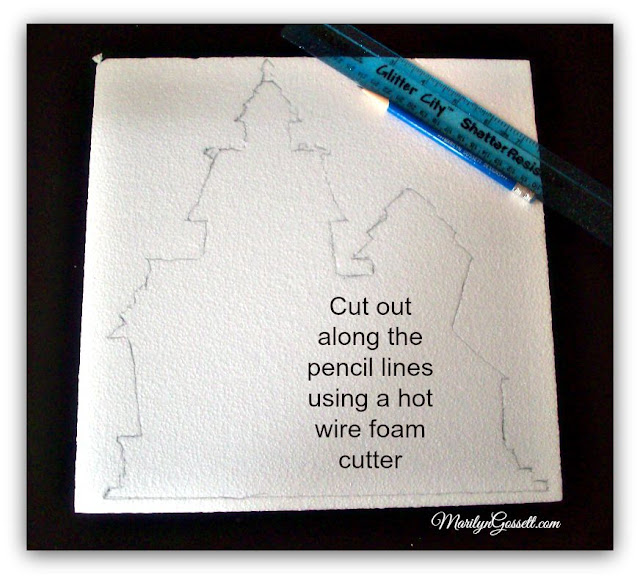
Print out pattern.  Cut out pattern pieces.  Starting with the larger pieces; trace around pattern piece onto the Smoothfoam using the pencil.  Repeat for each pattern piece.

Cut out all of the smoothfoam pieces using the hot wire cutter.


Paint all pieces Black.  Let dry.  


Trace pattern pieces onto the cardstock and cut out.  Use the black marker to draw in the details. Adhere the paper windows to the house as shown.  Sponge all of the edges with the white ink.


Join the pieces together using the toothpicks and a dab of hot glue to assemble.  Place all of the pieces before gluing.  

Enjoy your spooky decoration and have a Happy Fall!

Click here for patterns:
http://marilyngossett.blogspot.com/2015/09/haunted-house-pattern-3-pages.html

Sunday, February 28, 2016

3-D Etched Lid for Wedding Card Box


 Our Family has a joyous event coming this next August.  Our only daughter is getting married.  It has fallen to me to do much of the DIY decorating, cards and favors for the wedding.  I am thrilled to do so and this 3-D card box will be a nice addition to our wedding decor!

I started by gathering the supplies I would need to make my box.  I have pictured some of them in the photograph below.

For this project you will need the following:  

Etchall (R) reusable etching creme
Etchall (R) etchmask and transfer sheets

Die cut machine and die with wedding sentiment
12" Cardstock: Black; Black and White chevron design
Wooden Box with hinged lid:  12" wide x 3-3/4" deep
Vintage white Wooden Frame:  5 x 7"
Paints:  Teal, Vintage White, Matte Sealer
Paintbrushes:  1" flat, #6 fan brush
Embellishments:  Faux clear rhinestone trim with adhesive back; Pearl and Rhinestone adhesion's from a package.
Scissors
Paper Trimmer
Glue

Instructions:

Disassemble the frame. Discard the cardboard back and paper mat. Carefully remove, then wash and dry the glass.

Measure the space under the frame to decide how big to make your paper cut for the sentiment. Cut the sentiment from Black cardstock to get the right size for the space.

Using the same die and size; apply the transfer paper to the etchmask and cut out.  The etchmask image should be the same size as the black cardstock die cut.       

Remove the release paper from the yellow etchmask and adhere to the center of the frame glass. Follow the manufacturer's instruction and add the Etchall etching creme to the glass. When the time is up; scrape the etchall creme back into the bottle for another use. Then; thoroughly wash the glass in warm water before removing the Etchmask. Finish by removing the etchmask, rinse; then dry with a lint free towel.
Paint: Center the frame on the top of the lid and trace around the inside with a pencil.  Leave this portion of the lid white.  Paint the entire box vintage white.  Paint the top of the lid (Except for the middle portion) and sides of the lid teal.  Allow to dry.  Use the fan brush (dry) to apply vintage white to the frame and box lid to give it a distressed look.  Replace the glass in the frame and use the metal brackets to hold it firmly in place.  
The next step is the trickiest part.  Adhere the black cardstock sentiment directly under the etched portion of the glass.  This is what will give it the 3-D effect.  Center and glue the frame to the box lid. Double check to keep everything straight.

Cut the chevron cardstock as follows:  two 1-1/2" x 12" pieces for front and back; two 1-1/2" x 8-     3/4" for the sides. Cut 1/2" strips and glue around the sides of the frame. Make sure the seam is in the back.

 Finish: Complete by embellishing the box with the faux rhinestone trim and the adhesions.

Now it is ready for the wedding cards!  

This design can be adapted for any theme, party or color.  Enjoy!


Make sure to enjoy the small blessings along the way and,

Live Life with a Flourish!

Marilyn


Monday, February 1, 2016

I Love Valentine's Day!


Valentine's Day has always been a favorite day to celebrate!  It comes and goes way too fast; but if you plan a little ahead, you can be ready with some fun gifts and decor!
With some ribbon and cardstock you can create some fun seasonal decorations and gifts.  The ruffle flowers shown above are made with die-cut cardstock and hand gathered ribbons.  They are adhered to a fan handle and finished off with a few embellishments.  
Zoomed in for a closer view.......
Below is an idea for a Valentine's banner.
A bouquet of ruffled ribbon flowers......isn't it pretty?
The projects shown below were created using a Deflecto craft frame and clear vinyl pouches.  Here is the link to their craft site:  http://www.deflecto.com/craft/  The album is held together with a pear clip that deflecto also carries.

What is more fun than giving Love Coupons to a family member or friend?  There are a plethora of pretty cardstock papers to be found and there are many variations to be made of the mini Valentine coupon album shown in the photos given.


A closer look:..

I hope you are inspired by all of the Valentine ideas shown here today.  To see the rest of the designs shown on the blog hop today, just go to the link provided and hop on to the next designer's blog!

Have a wonderful Valentine's Day!


Make sure to enjoy the small blessings along the way and

Live Life with a Flourish!

Marilyn


Thursday, December 10, 2015

An Exciting Overview of what Deflecto has in store for CHA 2016!


"See you at the CHA Mega Show" Blog Hop


Deflecto has a line-up of exciting events coming to the 2016 CHA Mega Show!  If you haven't heard the name "Deflecto", you will be hearing it a lot in the near future!

To start the line-up of show events; we will be presenting a Deflecto Workshop on Thursday, January 11th.  Our theme is a Party theme and we will be celebrating with CHA for 75 years of craft world magic!

Below is a photo of the 5 projects we will be completing in the workshop.  If you haven't already made a reservation; there is probably still room available.  The space is limited to 25 attendees, so make sure to check it out!  I will be teaching the workshop along with some of our design team crew.

We just got exciting news!  Deflecto has won the honor of being a finalist in the "Hot New Product" line-up for the 2016 show!  The product being featured is the brand new 3-Tier Dessert Stand!  We will have one at our Workshop "Party" filled with cupcakes.  We have surprises in store so hope you can get a reservation!  Below is a photo of the Dessert Stand that we are so excited about!  It can be decorated with the theme of any party or event.  We will show you how!  Booth #2475.  It is among the CHA finalists for the New Hot Products at CHA!  Quite the honor!
Here is the 3-Tier Dessert Stand in action at a recent party!

AND!  That is not all!  We have more planned for this show!  This really big shew!

There will be 3 days of Make n' Take projects!  Here are some photos below of the 
gorgeous projects we have planned.  You won't want to miss any of them!


Green Frame with Flower - Day 1


Curved Magnetic Frame - Day 2


Fun new signage!  Day 3


Did I mention there is a cash prize for some very lucky person??  Check out how to get in on the give-away below!
_______________________________
    Win a $500= Visa Gift Card!!!

    There are just three entry options to win our $500+ Visa gift card:
    1. Leave a comment on your blog (mandatory) answering the question - "What is your favorite "can't live without" craft supply or tool?"
    2. Tweet about the giveaway  (tweet text includes #CHAshow hashtag; can tweet daily for extra entries)
    3. Answer a multiple-choice poll about how often you "cre8time" for crafting  (double entry value)
    Anyone and everyone in the US and abroad is eligible to enter, even you and your team. CHA staff are the only folks who are not eligible.

    Enter here>>  a Rafflecopter giveaway


    Below is the blog hop schedule:  Make sure to click on it to continue with the hop!


    We are looking forward to seeing you at the show!

    Cheers!

    Marilyn 
    Design Team Coordinator
    for Deflecto


    *This is a sponsored post.  I have been provided complimentary product in exchange for sharing my ideas and designs.


    Monday, December 7, 2015

    Celebrate the Holidays with Deflecto! A peek at new product!!


    Is anybody else excited about attending the CHA Mega Show in January??  I sure am!  I will be teaching a workshop and Make n' Takes for Deflecto and can't wait to see everyone!

    Holiday celebrations are in full swing! I recently had a party at my house and I got to use the brand spankin' new 3-tiered cupcake rack by Deflecto!  This versatile rack can be decorated in numerous ways to fit in with your party theme.  I used some decorative Santa Belly paper tape by Little B.  I applied it around the edges of the tiered platters.  I had a Santa Belly theme going as you can see!


    The 3-tiered rack starts out flat.  This makes for easy storing, easy mantling and dismantling!


    Below is a picture of the rack with the paper tape that I used before assembling and decorating.


    Below is the rack after it is assembled.  The weather here has been dark and rainy.  There wasn't a good way for me to get this picture.  You do get the idea though, right?


    Deflecto has many products that are perfect for any celebration or party!  I used their risers, sign holders, (small and mini), and the clips for connecting signage to your displays.  Check out the website for the crafts division at http://www.deflecto.com/craft/  for all of your signage and storage needs!

     Below are some more photos of the party table and Deflecto products that I used.


     The gal in the photo below was graciously helping me by holding an ice cylinder for me.  We were just getting the party started.  The Santa Belly cones shown below were our party favors.  I used more of the Santa Belly tape to decorate the painted paper mache' cones.

    Hope you got some inspiration on this blog today.  Be sure to come and see us at the Deflecto booth at the CHA mega show in January!  We will be showing off all of the new products and have some very fun events in store.  Did I mention there is prize money involved??  


    Be sure to take time to enjoy the small blessings along the way and

    Live Life with  Flourish!

    Marilyn


    Wednesday, November 25, 2015

    Etched Mirror for Christmas Decor


    Peace on earth and good will to all men!  That phrase rings in our heads as we prepare to celebrate Christmas.  We all want peace.  World peace, peace at work and in our families.  It seems to be more and more elusive as our technology changes and we race to keep up. 
    I found a beveled mirror at the craft store and a simple wooden easel to go with it.  Etching is the perfect way to personalize a mirror like this one and the message and image can be changed up for the occasion.  I like this idea for the table decorations at a winter wedding.  A monogram could be etched on each mirror for the wedding couple.  Of course there are many other themes to be designed around; but  Christmas and weddings are two of my favorites.

    Etching is easy to do and etchall creme is my favorite product to etch with.  You can see all of the etchall products on the website at http://etchall.com/

    You will need the following supplies:

    etchallR etching creme
    detail pick tool
    squeegee
    etchmasktm vinyl
    transfer paper

    Beveled Mirror
    Easel
    Snow-Tex by DecoArt
    Sugar Shimmer Glitter by Clearsnap
    Die-cut Machine
    Scissors

    1.  Calculate the size of the pattern you will need.  Apply etchmask vinyl to the cutting mat and cut out the design.
    2.  Remove the mat from the machine and apply transfer paper to the top of the design.  Turn over and use the pick tool to remove the letters from the transfer paper.
    3.  Position and adhere the etchmask and transfer paper to the mirror.  Remove all of the air bubbles with the squeegee.  
    4.  Peel the transfer paper away from the etchmask. Use pieces of the transfer paper like you would use painter's tape to cover the mirror around the etchmask design as shown in the photo below.
    5.  Follow the manufacturer's direction to apply the etchmask to the stencil.  Make sure to use plenty as you will be returning the product back to the bottle when you are done.  You can use it over and over until it disappears.  The creme will turn a dark brown eventually, but it is still good to go!  Wait 15 minutes; carefully return the creme back to the bottle and rinse off the entire piece.
    6.  Remove all of the etchmask and transfer paper.  Wash the glass thoroughly and dry.

    7.  To finish:  Follow the manufacturer's instruction to apply the Snow-Tex to the sides of the mirror. (I would use a light hand!)  Before the snow dries, sprinkle with the glitter. 
    This is going to be a Christmas present for a friend.  I am planning to make several more with a different message and design.  I think "Noel" with a snowflake will be nice for one!

    I hope you have a wonderful holiday season filled with Peace, Joy and Love!  Make sure to take time to enjoy the small blessings along the way and,

    Live Life with a Flourish!

    Marilyn


    I received moderate compensation 
    for posting this design.