Monday, November 4, 2013

Here is a perfect Thank-You gift for the Holidays!


I posted this last December, but thought it was worth a re-cycle!


Happy November!

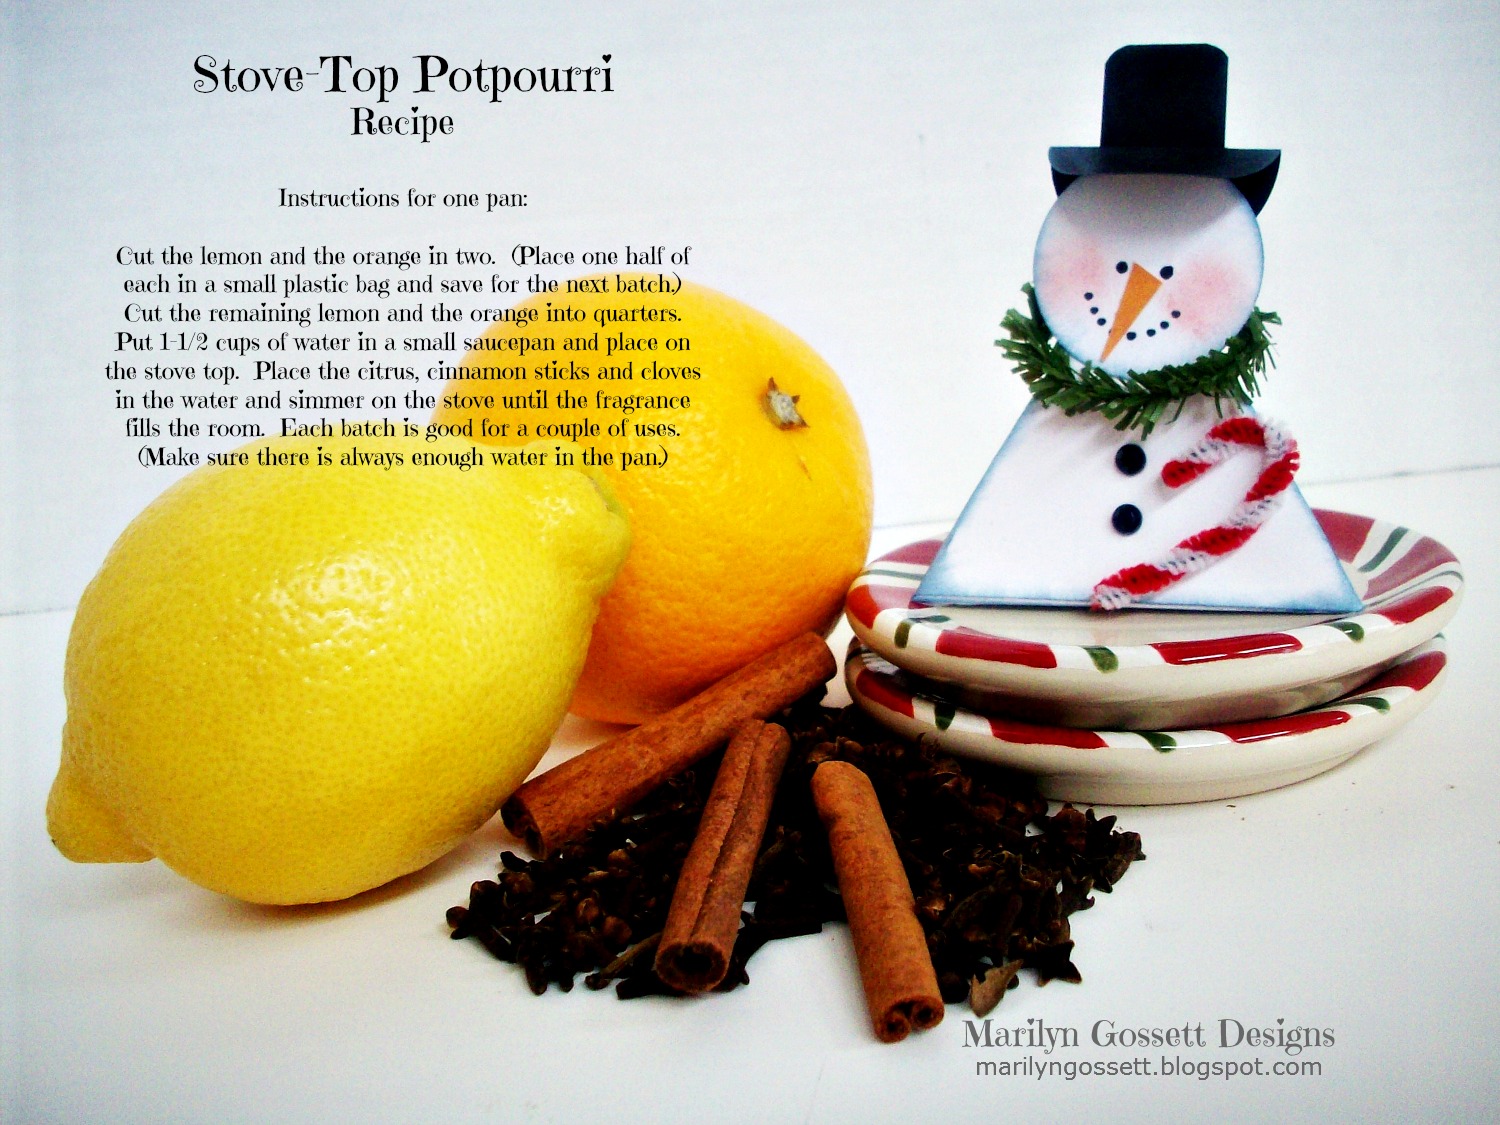
Every year I like to have home-made gifts to give out to friends for the Holidays.  This recipe for Stove-Top Potpourri is always a favorite and so easy to put together.  Packaging is up to you; I have used cello bags with pretty ribbons, decorated paper mache' boxes and kraft bags.  I like to put the cloves and cinnamon sticks in separate tiny plastic bags so they can be measured out without getting all over everything else.  Hope you enjoy making some!  I include the recipe with the gift, and thus the picture with the recipe on it that is shown here.  Yes, those lemons and spices went into someone's gift bag. You can change the recipe up a little depending on what you have on hand.  This recipe gives us most of the options; a lemon works nicely along with the orange!

Ingredients
  • 2 cinnamon sticks or 1 teaspoon ground cinnamon
  • 1 tablespoon whole cloves or 1/2 teaspoon ground cloves
  • 1 vanilla bean or 1 teaspoon vanilla extract
  • 1 orange peel, quartered (fresh cranberries are also great to add as well)
  • 1 whole nutmeg or 1/2 teaspoon ground nutmeg
  • 2 cups water
Directions
  1. Place water into a small saucepan. Add cinnamon sticks, cloves, vanilla bean, nutmeg and orange peels. Turn heat to medium until water starts to boil. Reduce heat to low and simmer as long as desired. Check water level every 1/2 hour that you have simmering. Water needs to be added as needed. Do not let water evaporate. Use potpourri for 2 days (adding additional water as necessary) then discard and make a new batch.
Makes 2 cups potpourri

This is a perfect Thank-You gift for a hostess!   The little snowman is perfect for hiding away some mulling spices or chocolates!  I cut the box on my Cricut machine and punched out circles for the head and hat.  Easy and cute!

 So, let the Holidays begin!  Click on the blue DCC button to check out great thank-you gifts from more designers.

Happy Holiday Crafting!

Live Life with a Flourish,

Marilyn

Tuesday, October 15, 2013

Designer Challenge featuring STICKY STICKStm


SNOW BURST WALL DECOR


Supplies you will need:

Sticky Stickstm: 16
Smoothfoamtm:  one 6" wide x 1" thick disk
Cardstock, three 12" x 12" sheets (I used papers from the "Frosted" collection by Close To My Heart); two 12" x 12" cream colored plain (for the snowflakes)
Inkpad, blue;  sponge
Mica Snow glitter
Paper cutter, scissors, die-cut machine (Cricut)
Artiste Cricut cartridge by Close To My Heart (For snowflakes and rosettes)
Decoupage medium or tacky glue, brush sponge
water bucket, paper towels, paper plate

Paper Rosettes:  Die-cut  and assemble one 5-1/2", eight 2-1/2"
Snowflakes:  Die-cut  fourteen 1-3/4", seven 2-1/2", one 4"


The adhesive patch on the flat end of the stick is a strong bond that is permanent.  In other words, you cannot remove paper from it without it tearing and it will hold heavier items than most adhesives.  For this Snow burst design, the adhesive will adhere each stick to the front (right side) of the foam disk.


Below is a close-up of the adhesive strip.  Before using, you peel away the release paper that is still in place here.


Trim the rounded end of each stick into a rounded point.


Cut 3/4" strips of paper.  Trim to fit the front and back of each stick.  Leave the adhesive  area open.  Adhere with decoupage medium or tacky glue.


Repeat the above step with the remaining Sticky Sticks.


Trace around the foam disk onto the wrong side of the cardstock.  Cut one out for the front and the back.  Adhere.


Cut and adhere  1" x 12" strips of cardstock around the sides to finish.  Trim excess.


 Shade edges of disk and sticks using the wedge sponge and inkpad.

Space the sticks evenly around the disk. I recommend marking your spaces. Remove the release paper from each stick and adhere to the front of the disk.  Make sure you are happy with the placement before you make it permanent!  The accordion fold rosette will cover up the ends of the sticks on the front of the snow burst.


Did you make a mistake?  Don't panic!  Just lift the stick as carefully as possible and repair the adhesion 
with a little tacky glue if needed.


Now you are ready to embellish!  Cut out the snowflakes and rosettes using the die-cut machine.  Assemble the rosettes.  Once you get the embellishments placed and glued, apply glue to the snowflakes and apply the glitter.  Allow to dry. Adhere the snowflakes to the project as shown in photos given.


I think I got an optical illusion with the photo below!  Interesting, huh?


If you would like to locate a retailer or find out where to purchase Sticky Sticks; visit the website @ www.stickysticks.com

Feel free to message me if you have any questions!  I hope you are having an awesome Fall and are savoring every minute of the season!  Click on the blue "Designer Craft Connection" button at the top of the page to hop through some more Sticky Sticks creations by CHA Designers!  Enjoy!

Live Life with a Flourish,

Marilyn


Friday, October 4, 2013

Sticky Sticks, Glue and a Scarecrow too!


Fall has arrived!  Here in the Pacific Northwest it arrived  in the form of the Pineapple Express.  Lots and lots of rain and warmer temperatures!  Today was finally a typical Fall day with a chill in the air and sunshine.  I think we are all ready for a change....but not Christmas quite yet!  We still have Halloween and Thanksgiving coming up and I want to enjoy it all!

I have had the pleasure of playing with a product called Sticky Stickstm.  They are jumbo craft sticks with a strong adhesive bond on one end.  I love the simplicity of these sticks and aim to maximize the main features they offer.

A little scarecrow can grace the home decor throughout October and November.  I created this cute little guy with just a few supplies.  The following supplies are what you will need:

Sticky Stickstm
Cardstock papers in Fall colors (I used Close To My heart "Sarita" papers)
Scraps of cardstock for facial features, black, brown, orange
2" Smoothfoamtm ball
Scrap of natural burlap (or muslin fabric)
Jute twine
Straw hat, 4"
Typing paper and pencil
Scissors
 Lowmelt glue gun and sticks, tacky glue
*optional: brown inkpad and sponge to shade edges

Refer to the photo given below and adhere the sides of the sticks together to secure.


Remove the release paper on the adhesive, position the arms and legs over the back of the "torso" portion and adhere. Make sure you are ready to do this step before you remove the release paper  because it is a very strong adhesive. (The release paper is still attached in the photo below.)


For your pattern: Lay the sticks on the typing paper and trace around the body, arms and legs. Trace around your pattern onto the cardstock for the shirt, pants, etc. Cut these out for the front and the back of the scarecrow.  Adhere.


For the head:  Smooth the burlap fabric over the Smoothfoam ball.  


Tie around the base of the ball to secure.  Trim excess.


Spread out the "neck" portion of the burlap and adhere the head to the top of the body.  The glue gun works best for this step.  The photo below shows a "back" view of the scarecrow.


Cut out little triangles for the eyes and nose.  Wrap jute twine around the wrists, ankles and waist and tie to secure.


He needs a little straw hat to keep his head warm.  You might look around at the craft store and find a style you like better.  I have made one from felt fabric if I can't find one at the store.  Just a circle of felt, needle and thread!


Here is a closer view of his face.  It doesn't have to be real exact.  After all, he is supposed to be a little bit scary, right??


I hope the pictures help!  If you would like to share photos of your own project, I would love to see!  I have a Fan page on Facebook.  Marilyn Gossett Designs aka Top of Mind Designs.  Feel free to share!

If you would like to craft with Sticky Sticks, they can be found at most local retailers or visit www.stickysticks.com.  They are a new product and lots of fun for kids and adults alike!

Happy Crafting
&
Happy Fall!

Live Life with a Flourish!

Marilyn


Sunday, September 29, 2013

Create a BOO-tiful decoration for Halloween!


Boo....Eek...Shriek!  Bats, Cats, Goblins, Ghosts & Creepy Crawlies!


Do you enjoy decorating for the changing seasons?  I sure do! As a kid, I loved celebrating the seasons by creating craft projects to reflect the fun activities that we looked forward to. Some things that come to mind are costumes, candy, cool windy shorter days,  laced with apples, apple cider, pumpkins, gourds and pretty leaves! We didn't have a lot to spend in those days, but having to create my own projects heightened my love for crafting!

Would you like to know how to take these painted Smoothfoamtm blocks and balls.....


and turn them into the project shown below??


If so, just click on the link below and you will get the instructions to create this fun Halloween decoration for yourself!

http://www.smoothfoam.com/blog/bats-cats-and-spiders-oh-my/

While you are on the Smoothfoamtm Blog, look around!  You might find something else to tickle your fancy in this array of great ideas!

Pictured below is another Halloween idea for using the Sticky Stickstm  featured in my last Blog post.  The chocolate nugget is wrapped in green paper and the face is drawn on the front.  The adhesive strip on the end of the Sticky Sticks is great for holding items with a little weight.  You don't have to worry about the candy popping off.  Trick or Treat!  Enjoy!


Hope you enjoy the October days ahead with family and friends!

Happy Crafting!
Live Life with a Flourish!

Marilyn

Wednesday, September 11, 2013

HALLOWEEN FUN WITH "STICKY STICKS tm"


Have you heard of Sticky Sticks?  They are unique to the world of craft sticks and I will tell you why!  There is a strong adhesive on one end of the stick.  Peel off the release paper and adhere!  Easy and fun!

I just got some a couple of weeks ago and had to try them out right away.  With Halloween coming up in the near future, I thought these would work great for a quick and easy treat idea, taking advantage of the strong adhesion on one end.  The bond is much stronger than the traditional tape
runner.  This allows you to glue something to the end that might be a little heavier than you would normally consider.
Most households have a craft stash of scrapbook papers, rubber stamps, and such.  I used my die-cut machine and Cricut Artiste cartridge from Close To My Heart for the die-cuts you see here.  The rubber stamp came from Close To My Heart as well. The craft stores are full of cute stickers and embellishments that would be fun to use.  A scissor, paper cutter, pencil & tape runner will come in handy too!


Aren't these a fun cast of characters?  I sure had fun making them!


Being a visual person myself, I think this is the best way to teach you how to do this!


Same story, little different version.......


I will be posting a monthly project featuring Sticky Sticks.  If you enjoyed this project or have any questions, please message me!  I would love to hear from you.

Would you like some of these for yourself?  They are available at most major craft retailers and can be found on their website at http://stickysticks.net/Stores.aspx.

This design concept isn't limited to Halloween!  I plan on making some for the other Holidays and maybe some that are "just because".  If they turn out really cute, I will put them up and share!


Happy Crafting!
"Live Life with a Flourish"

Marilyn


Tuesday, September 3, 2013

NEW way to Scrapbook your Memories??


Hi Friends!
September has arrived and we are in the last days of summer before we get to Fall!  Summer vacations provide so many photo opps…fun times with friends and family. This accordion-fold mini scrapbook block is perfect for tucking away little mementos & reminders of your summer getaways. It would be fun to make one commemorating any season, or holiday, or a special event like a baby’s birth or a wedding!
Accordian mini scrapbook block with Smoothfoam by Marilyn Gossett
Supplies:
3″ Smoothfoam cube
12″ sheets of cardstock with coordinating papers and embellishments
( I used the ”Surf’s Up” assortment from Close To My Heart)
Rubber stamps and ink pads
Die-cuts, mini-envelopes, ephemera, photos
Cosmetic sponge wedge
Dry adhesive
Dimensional adhesive
Jute twine
Paper trimmer and scoring tool
Scissors
1.  Cut a sheet of cardstock into four 3″ x 12″ strips.  Score each strip at 3″ intervals and fold accordion style.
Accordion mini scrapbook prep
2.  Cut contrasting papers into 2-3/4″ squares and adhere a square to each panel of the cardstock on both sides for all four strips. Adhere a strip to each of the four sides of the cube.
3.  Embellish the squares on each strip as desired with photos, die-cuts, etc. Tuck little notes and other ephemera into mini pockets.
4.  Adhere a finished strip to each side of the cube, then adhere a square of paper to the top and bottom of the cube.
3.  Display your accordion-fold mini scrapbook open, or secure by tying a length of jute twine around the cube.
Accordion mini scrapbook closed
Below is a variation using one of my favorite papers!  Are you inspired now to make some of these?  I used a three inch Smoothfoam block for each cube.  You can go a little bigger or smaller.  I think this would make a great gift for a friend or family member that you want to share memories with!


Hope you are inspired.  Each page on the scrapbook block has seven surfaces to put pictures, etc.That is a lot of space for little photos and mementos!

Happy Crafting; 
 may the Blessings flow!

Marilyn

ps.  Remember to "Hook it Up"  with CraZy TACKz!  

They are available now online at www.crazytackz.com, at JoAnn's Fabrics stores, Container Stores...and misc. others!  If you don't find them, please ask!


Tuesday, August 27, 2013

A few giggles from Laughing Lola!


It is almost September!  Who woulda' thought that Summer would pass so quickly?  It isn't completely gone yet, right??  You would not be aware of that fact if all you had to go by were the isles in the craft stores and department stores right now.  I am feeling a little ADD, working on all the holidays while still experiencing the heat of Summer.  The life of an avid crafter!  We have to stay ahead of the rush!

The featured paper for my September workshop is "Laughing Lola".  I love this paper.  It is perfect for the "back to school" season and can be carried over into October.  The colors are vibrant and so fun!  I have a lot of wood in my arsenal and have incorporated using the papers with a cute wooden box and some wood tags that I love.  


Next up are a set of greeting cards that I created using the Laughing Lola chipboard Complements to embellish. I used the pink zip strip off of one of the 12" sheets of paper for the saying on the bottom of the card. (The zip strip is the strip that has all of the ordering info on one side and a design on the other). I actually used one 12" long zip strip for all three cards!  These were so fast and easy that I had to share.


Are you inspired to craft now?  I have so many friends that don't think they are "crafty" or talented enough to make projects such as these.  That is why I do this!  I love to teach how to get er' done by having everything cut out and ready to go for the workshop.  I guide as it is needed and at the end of  the "fun" they will have a complete set of cards and a big smile on their faces!  Did I mention we like to talk, eat, drink coffee and tea while we work?  Sometimes we throw a little popcorn into the mix.  It is just about having fun!

Thanks for taking time to stop by and check things out.  If you have any questions, please message me.  I would love to hear from you.

May the Blessings flow freely;
Happy Crafting!

Marilyn

Don't forget you have until the end of August to get this really fun Chocolate Lovers Stamp set for FREE with a $50.00 order!