Wednesday, August 29, 2012

Scrapbook Soup Video has arrived!


Hello Friends!

The long-awaited Scrapbook Soup video has arrived!  We filmed a segment in Cleveland that will air on PBS (#210 from the series) sometime in September.  This of course depends on whether you get the show on your local PBS station, but we have the CraZy TACKz segment as seen on Scrapbook Soup to show you RIGHT HERE!

It was a hustle-bustle trip to Cleveland, Ohio to the studio.  All of my supplies arrived ahead of me and it was my job when I got there to unpack everything in the green room and get it ready for the show.  I created a quad of wall art pieces that would showcase CraZy TACKz, and some of the possibilities for using them in a decorative and useful way.

When it came my turn, we took everything from the green room to the studio (the set is very fun and colorful) and quickly went over the elements and presentation steps.  Kathy Stull owns the production company that produces this and other PBS shows, and she was great at condensing the steps that best showcased our product.  Julie McGuffee is a friend and longtime host of the show, (formerly known as Making Memories) and she is skilled at fitting everything into our time constraints.  We only had minutes to film our segment...so I didn't want to make too many mistakes!

My plane ride to Cleveland was an all day trip..with layovers and a few hours (not in my favor) time difference.  I am glad that we have the memory to last a long time.  It made the long trip well worth it!

So, here is the CraZy TACKz segment from Scrapbook Soup!

http://www.youtube.com/watch?v=vCTDcKmRSw8&feature=youtu.be

Hope you enjoy the show!

Instructions for the project can be found on the website at Scrapbook Soup once the show airs.  This is the link!  Print them out and enjoy!

http://scrapbooksouptv.com/projects/SS_200/210/Scrapbook_Soup_210-2.html


Hope you are enjoying what is left of our Summer!  We are already thinking about Fall and Christmas!

Happy Crafting!

Marilyn
Designer/Consultant 
for CraZy TACKz
www.crazytackz.com
www.marilyngossett.com


Sunday, August 5, 2012

CRAFTING WITH SCHOOL SUPPLIES


School days.....school days.....


Even though we are barely into the month of August, which is normally the warmest month of the summer, thoughts are starting to turn to September, and the kids getting back to school. 

I have been out of school for many years, but I still love school supplies!  Binders, pens, pencils, markers, crayons!  I love them all.  I have been digging some out for this month's Designer Crafts Connection blog because our theme is "Crafting with School Supplies".  I don't know if many of you have been watching the new show sponsored by Michael's called "Crafting Wars", but they have been doing some pretty amazing stuff in their challenges with school supplies.

I created what I would call a "beginners" project.  It is very pretty to look at, but also very simple to craft.  I finished mine up in about an hour.  I may have had some time to spare.  The following are the supplies that I gathered:


Composition book (regular size)
Jumbo paper clips, 6 white
Pencil (new)
Craft glue
Glue stick (not for glue gun)
Glitter
Memory cardstock (DCWV The Chateau Lavender Stack)
Paper Blooms (Coconut by KaiserCraft) 6 blooms
Paper cutter
Ruler

I cut two rectangles of my chosen papers.  One for the front of the composition book and one for the back.  Then I cut a contrasting piece of memory paper the length of the book by about 3" wide and glued it to the spine of the book.  (Refer to photo given.)


I cut an element from a piece of the memory paper that looked like a seed packet.  I allowed 1/2" around the sides and bottom for gluing.  Fold the sides and bottom to the wrong side of the paper to form a pocket.
Position and adhere the pocket to the front of the book, leaving the top open....( just reminding you....lol.)


Cut paper to fit around the pencil and wrap tightly.  Adhere the paper to the pencil using the glue stick.


Paperclip/Bookmarks:  For one:  Punch or use personal die-cut machine to cut two 2-1/2" circles.  Glue the top of one paperclip between the paper layers, wrong sides facing.  Glitter flower and adhere to the circle.
Repeat for each paperclip to make a set of six.


Here is the finished journal, pencil and set of paperclip/bookmarks.  Fun, easy, and a great girlfriend gift!


I have one more project to show today.  I design for a new company called CraZy TACKz that has a new, patented "tack with a hook".  I used some school supplies in a more obvious way to show you how these nifty little tackz can come in handy.


This is a simple frame that usually costs around one dollar.  It is painted with black chalk paint.
The crayons and pencils were wrapped with some jute twine and adhered to the board.  The 
CraZy TACKz will push into soft wood and hold up to 2 lbs.  1/2" thick cork board was placed in the center for hanging notes, pictures, etc.  These are great for hanging jewelry, keys, other supplies, etc.

Check out our blog hop each month to see what myself and other designers are up to.  We have a different theme to craft by each month.  Don't forget to go to the Designer Craft Connection badge on the sidebar and hop forward or back to see the designs and posts by other member designers.  


Thanks for coming by!

HAPPY CRAFTING,

Marilyn
Designer/Consultant for
CraZy TACKz
www.crazytackz.com
www.marilyngossett.com


Thursday, July 26, 2012

Got Scraps? Here's a fun and cute solution for using them .


Hello Friends,

Anybody besides me enjoying the sunny days of summer?  I enjoy them even when I am inside the house working.  There is something energizing about the sunshine and longer days.  I have been cleaning and purging my studio again lately (it is a never-ending job), and have had to make decisions about what paper to keep; what to throw away, and what to donate.  I am certain that you other paper crafters out there end up with lots of scraps that you hate to throw away.  Well, I have a solution!

I love the looks of the mixed media albums and journals that are so popular right now.  I have a friend who sells supplies overseas and has to send everything in "smalls".  She enjoys the 2-1/2" x 3-1/2" size, so I decided to use my pretty paper scraps to make some little albums.  I gathered scraps, paper cutter, 3/8" hole punch, adhesives, scissors, embellishments (i.e. stickers, sayings, punched flowers, die-cuts, sequins, rhinestones, chalk inks, sponge, etc. I picked up some book binder rings from my Staples store and was ready to make my little books.

I cut the papers into 2-1/2" x 3-1/2" rectangles...then punched three holes evenly down one side.  All of the papers should be punched in the same place.  I have a special pattern that I made up for the pocket page.  You can also cut a smaller rectangle and glue it to the page to make a pocket, or glue a little paper bag to the page to put things in. I punched out tabs and glued them to the pages. Once I embellished and stamped on all of my pages, I attached the paper binders.

Here are some close-ups of my albums.


This is the front and it has a tabbed pocket on it.  I chose to put business cards in this pocket.  I like having important information handy!


You can see in this picture about how many pages are in it....you cant really see all of the cute things
I put on the pages though......I will add some other photos later with better views of the pages.


Of course if I am going to have my important info in a handy little book, I also need a handy place to keep it.
Enter....CraZy TACKz!  I used a CraZy TACKz that matched my little album from a Designer package of the rounds in black, white and red.  The TACKz will hold up to two pounds.  My little book doesn't weigh anything near that!  It is mounted close to my computer for easy access.  

I can line up all of my little books if I want to.  Fun!  Here are some more views as I promised!


The embellishments were little scrappy things that I found in different places.  I am not sure they would 
have turned out as cute if I had planned every page!  I just started gluing and pasting!

That is about it for today.  I will post some more examples of the books in the next day or two.  Hopefully this is enough to inspire you to get started on some of your own.  Thanks for stopping by!

Happy Crafting!

Marilyn
Design Consultant
for
CraZy TACKz 
www.crazytackz.com
www.marilyngossett.com


Monday, July 16, 2012

ABC JUNGLE BOARD with CraZy TACKz


Good Morning Friends!

I just finished a piece of wall decor to hang up mementos or items you want to have handy for a kid's room. I used some cool items from New Image including CPE felt, Lara's wood shapes and of course our clear CraZy TACKz. The TACKz were embellished with black glitter before using them on the board. There is a tutorial on an earlier blog for applying glitter to the CraZy TACKz.  I covered a 12" square Smooth Foam wall mount from Plasteel Corporation with the giraffe patterned felt, then inserted it in the wooden frame that has a 1/2" indent.  (Found these at Craft Warehouse and Ben Franklin's Craft and Frame Shops).

At the bottom of the frame there is a wood rectangle that I painted and made into a shelf, secured by gluing 1/2" wood blocks to the frame and under the painted wood rectangle.

The pre-painted monkey and zebra shapes are secured in a standing position by gluing the same sized blocks to the backs of the feet and to the base.  The blocks are not visible from the front view.  There is room on the "shelf" to place a little jar of Q-tips, a picture, etc.


The CraZy TACKz were applied to the monkey's noses and along the top of the board. You can hook up jewelry, mementos, etc. for safe keeping. I have some ideas for up-cycled stuff that I will post a little later. Blogger has changed a little and I am still getting used to it. Hope this added a little inspiration to your day. I will post more soon!

I will close with a little tip from the CraZy TACKz Solutions board on my Pinterest site. It is summer and time for barbecues in the back yard. Here is a tip via photograph to keep your tools handy and organized.


Our summer has finally warmed up here in the Pacific Northwest. We are having beautiful days in the backyard and great meals on the bar-be. This is why we put up with so much rain during the rest of the year! Hope you are enjoying the dog days of summer as well!

The CraZy TACKz are now available at many crafting retailers and fabric stores.  Ask for them!


Happy Crafting!

Marilyn
Designer for
CraZy TACKz

www.crazytackz.com
www.marilyngossett.com


Sunday, July 1, 2012

A Place for your Keys!


Do you ever get frustrated because you can't find your keys?  I know I do!  

While shopping at Craft Warehouse, one of my favorite craft supply stores; I was browsing in their wonderful selection of unfinished wood supplies.  I found this shadow box with a little piece of string and clothespins built in to hang something inside.  I thought this 
would be a little different twist to putting my words on the outside of the box or frame.

I am always thinking about how to use our CraZy TACKz in a way that is a little more creative than poking them straight into a wall.  Not that they don't work great for that, but I favor a piece of wall decor that is also useful and attractive.  Below I have posted pictures of the steps necessary to create this shadowbox-key holder.  Here are the supplies I started with to complete the project.


This is how the unfinished wooden shadow box looked before I took it apart to decorate.


This next photo is of the box taken apart.  There are three parts, four counting the glass in the front.


The top piece shown has the string attached and there are extra mini clothespins to hang your pretties with.  I put a wash of a brownish green paint on all of the pieces and let it dry thoroughly before the next step.  (Carefully remove the glass and set aside while you are working on the wood pieces.)


Here is the back of the frame.  I cut the paper to fit the piece of wood and used decoupage medium to attach it.  Allow to dry, glue other embellishments to the piece as desired.  I used some little cut out scraps of memory card stock and some little metal sprocket pieces that I found in the scrap-booking department.


I cut paper strips to fit the sides and front of the shadow box frame, then cut out banner pieces on my personal die-cut machine.  They are about 2"cuts, with slightly smaller pieces for the inserts.  The letters are from a package of alphabet stickers and measure about one inch high.  As you will see in the picture of the finished project, I clipped them to the string with the extra mini clothespins.


Here is another picture of the finished project.  The basic clear CraZy TACKz were decorated with gold glitter and I used a jewelry pliers to gently push the tack into the wood.  The CraZy TACKz are not recommended for use with a hard wood, but most unfinished wood pieces in the craft stores are made from a soft wood such as pine or bass.


Here is the final picture and a close-up view of the CraZy TACKz in the bottom of the frame. See how cool they are for hanging the keys?  If you plan on putting quite a bit of weight on this, make sure the frame is anchored to the wall securely.  Hope you enjoy this project, I will be posting more in the coming week.  I stocked up on wood that looked fun to decorate when I was at Craft Warehouse.  If you enjoy getting new project ideas and ways to use CraZy TACKz, please join this Blog and keep in touch.

Hope you are enjoying the summer!

Happy Crafting,

Marilyn
Design Consultant
for
CraZy TACKz
www.crazytackz.com
www.marilyngossett.com


Banner & CraZy TACKz!  Use the tackz to hang the banner,
use the hookz to add balloons.  Viola!

Tuesday, May 29, 2012

CraZy TACKz Event: Portland, Oregon


Hello Friends,

It has been almost a month since the last post.  Where does time fly to?  Summer is almost upon us and it is the season to plant and toil.  Hope everyone had a great Memorial Day Week-end!

Gordie Murphy, CraZy TACKz Inventor
The 9th of June (one week from this coming Saturday), we will be at Fabric Depot in Portland for a CraZy TACKz event.  Our inventor, Gordie Murphy, will be making an appearance and will probably be happy to sign a few boxes of his new, patented invention, CraZy TACKz.  You can say you saw them here first!

We have put together a Make-N-Take project featuring CraZy TACKz.  I am attaching a few pictures of sample projects we will be showing at the event to feature a fun and easy application for using CraZy TACKz in a wall hanging or for wall decor'.

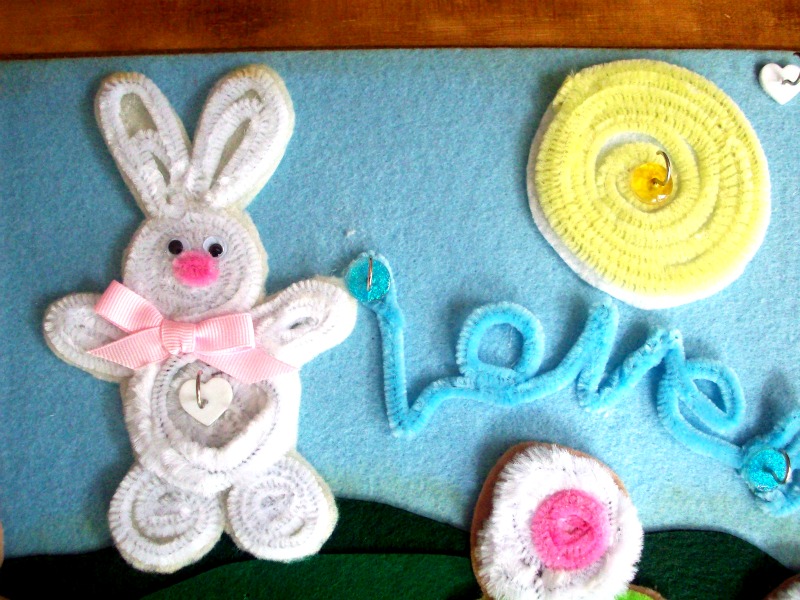
The flowers and shapes are made from Chenille stems.  There is a little more technique involved to get the final result and we will be giving our customers a chance to learn the technique and apply it to their own creation.

There will be something for adults and for kids.  The following are some samples of what we will be showing at the June event.  Come and join us if you are within driving distance!  I will post once more with details as it gets closer.


These shapes are made from the chenille stems and the decorated Tackz are attached to the board.  The hooks on the Tackz can be used to hang jewelry, keys, mementos, etc.  Below are some more ideas using the chenille stems.


The round posies shown above will be the featured Make-N-Take at our event.  Come and make one for free!  Take home some new ideas as well! Below are a few more samples.


There ya go!  That is it for today.  Mark your calendar for Saturday, June 9th, 2012.  
Hope to see you there!

Happy Crafting!
Marilyn
Design Consultant
for
CraZy TACKz
www.crazytackz.com
www.marilyngossett.com


Friday, May 4, 2012

FUN WITH CraZy TACKz!

Hello Friends!  Hope you are having a good day today!  I am enjoying all of the beautiful green that comes this time of year in the Pacific Northwest...just waiting for some sunshine! 

I have a fun and quick technique to show you.  Gordie Murphy, the inventor of CraZy TACKz also has a business called "Teaching Made Easier".  He was attending a trade show recently and was introduced to a product by Elmer's Glue, a variety of glitter glues and shiny colored glues.  Being a resourceful guy, he grabbed a box he had handy, (recycle project), and poked a bunch of clear CraZy TACKz into the box.  Then, he quickly applied different colors of the glitter glue to the stoppers of the tackz!  It had to be quick, or he wouldn't have done it!  So, the end result were glittered and colorful tackz ready to be used directly in chosen surface, or to be further embellished with paper punches, etc.  For some embellishment ideas, check out the crafts section of the website at http://www.crazytackz.com/.  There will be lots more ideas posted on the website as time goes on.  So check back frequently!

Below is a picture of Gordie's decorated CraZy TACKz!  This is a primo Create It Yourself project!


This is a super big close-up, but I want you to get a good look at the product on the tackz.

Again, for more decorating ideas on CraZy TACKz, visit www.crazytackz.com, the craft section.  Check out our videos while you are there too!

Hope you are making it a great day!

Happy Crafting!

Marilyn
Design Consultant 
for
CraZy TACKz

www.marilyngossett.com
www.crazytackz.com