Sunday, July 1, 2012

A Place for your Keys!


Do you ever get frustrated because you can't find your keys?  I know I do!  

While shopping at Craft Warehouse, one of my favorite craft supply stores; I was browsing in their wonderful selection of unfinished wood supplies.  I found this shadow box with a little piece of string and clothespins built in to hang something inside.  I thought this 
would be a little different twist to putting my words on the outside of the box or frame.

I am always thinking about how to use our CraZy TACKz in a way that is a little more creative than poking them straight into a wall.  Not that they don't work great for that, but I favor a piece of wall decor that is also useful and attractive.  Below I have posted pictures of the steps necessary to create this shadowbox-key holder.  Here are the supplies I started with to complete the project.


This is how the unfinished wooden shadow box looked before I took it apart to decorate.


This next photo is of the box taken apart.  There are three parts, four counting the glass in the front.


The top piece shown has the string attached and there are extra mini clothespins to hang your pretties with.  I put a wash of a brownish green paint on all of the pieces and let it dry thoroughly before the next step.  (Carefully remove the glass and set aside while you are working on the wood pieces.)


Here is the back of the frame.  I cut the paper to fit the piece of wood and used decoupage medium to attach it.  Allow to dry, glue other embellishments to the piece as desired.  I used some little cut out scraps of memory card stock and some little metal sprocket pieces that I found in the scrap-booking department.


I cut paper strips to fit the sides and front of the shadow box frame, then cut out banner pieces on my personal die-cut machine.  They are about 2"cuts, with slightly smaller pieces for the inserts.  The letters are from a package of alphabet stickers and measure about one inch high.  As you will see in the picture of the finished project, I clipped them to the string with the extra mini clothespins.


Here is another picture of the finished project.  The basic clear CraZy TACKz were decorated with gold glitter and I used a jewelry pliers to gently push the tack into the wood.  The CraZy TACKz are not recommended for use with a hard wood, but most unfinished wood pieces in the craft stores are made from a soft wood such as pine or bass.


Here is the final picture and a close-up view of the CraZy TACKz in the bottom of the frame. See how cool they are for hanging the keys?  If you plan on putting quite a bit of weight on this, make sure the frame is anchored to the wall securely.  Hope you enjoy this project, I will be posting more in the coming week.  I stocked up on wood that looked fun to decorate when I was at Craft Warehouse.  If you enjoy getting new project ideas and ways to use CraZy TACKz, please join this Blog and keep in touch.

Hope you are enjoying the summer!

Happy Crafting,

Marilyn
Design Consultant
for
CraZy TACKz
www.crazytackz.com
www.marilyngossett.com


Banner & CraZy TACKz!  Use the tackz to hang the banner,
use the hookz to add balloons.  Viola!

Tuesday, May 29, 2012

CraZy TACKz Event: Portland, Oregon


Hello Friends,

It has been almost a month since the last post.  Where does time fly to?  Summer is almost upon us and it is the season to plant and toil.  Hope everyone had a great Memorial Day Week-end!

Gordie Murphy, CraZy TACKz Inventor
The 9th of June (one week from this coming Saturday), we will be at Fabric Depot in Portland for a CraZy TACKz event.  Our inventor, Gordie Murphy, will be making an appearance and will probably be happy to sign a few boxes of his new, patented invention, CraZy TACKz.  You can say you saw them here first!

We have put together a Make-N-Take project featuring CraZy TACKz.  I am attaching a few pictures of sample projects we will be showing at the event to feature a fun and easy application for using CraZy TACKz in a wall hanging or for wall decor'.

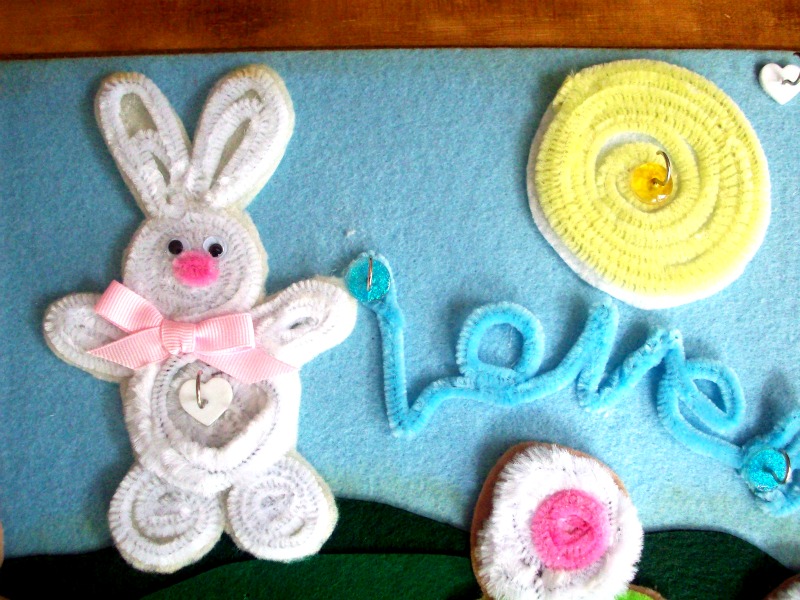
The flowers and shapes are made from Chenille stems.  There is a little more technique involved to get the final result and we will be giving our customers a chance to learn the technique and apply it to their own creation.

There will be something for adults and for kids.  The following are some samples of what we will be showing at the June event.  Come and join us if you are within driving distance!  I will post once more with details as it gets closer.


These shapes are made from the chenille stems and the decorated Tackz are attached to the board.  The hooks on the Tackz can be used to hang jewelry, keys, mementos, etc.  Below are some more ideas using the chenille stems.


The round posies shown above will be the featured Make-N-Take at our event.  Come and make one for free!  Take home some new ideas as well! Below are a few more samples.


There ya go!  That is it for today.  Mark your calendar for Saturday, June 9th, 2012.  
Hope to see you there!

Happy Crafting!
Marilyn
Design Consultant
for
CraZy TACKz
www.crazytackz.com
www.marilyngossett.com


Friday, May 4, 2012

FUN WITH CraZy TACKz!

Hello Friends!  Hope you are having a good day today!  I am enjoying all of the beautiful green that comes this time of year in the Pacific Northwest...just waiting for some sunshine! 

I have a fun and quick technique to show you.  Gordie Murphy, the inventor of CraZy TACKz also has a business called "Teaching Made Easier".  He was attending a trade show recently and was introduced to a product by Elmer's Glue, a variety of glitter glues and shiny colored glues.  Being a resourceful guy, he grabbed a box he had handy, (recycle project), and poked a bunch of clear CraZy TACKz into the box.  Then, he quickly applied different colors of the glitter glue to the stoppers of the tackz!  It had to be quick, or he wouldn't have done it!  So, the end result were glittered and colorful tackz ready to be used directly in chosen surface, or to be further embellished with paper punches, etc.  For some embellishment ideas, check out the crafts section of the website at http://www.crazytackz.com/.  There will be lots more ideas posted on the website as time goes on.  So check back frequently!

Below is a picture of Gordie's decorated CraZy TACKz!  This is a primo Create It Yourself project!


This is a super big close-up, but I want you to get a good look at the product on the tackz.

Again, for more decorating ideas on CraZy TACKz, visit www.crazytackz.com, the craft section.  Check out our videos while you are there too!

Hope you are making it a great day!

Happy Crafting!

Marilyn
Design Consultant 
for
CraZy TACKz

www.marilyngossett.com
www.crazytackz.com


Sunday, April 22, 2012

ON THE SET OF SCRAPBOOK SOUP!

I'm home!
It was a whirlwind trip to Cleveland, Ohio from Portland, Oregon!  By the time I arrived at my destination, I was in the red three hours, not in my favor.  This was no big deal when I was in my 20's...enough said!
When I got to the studio (after a harrowing cab ride), I was greeted by an awesome production crew and a very friendly atmosphere.  After all, crafting is all about having fun!  This group of professionals made me feel very much at home and provided a comfortable facility to prepare in.

My friend Julie McGuffee and I go back to the early 90's to a time when we were both putting out lots of craft books from different sides of the country.  She was in Texas and I was in Oregon and we both produced books but from different publishers.  There was no "designer" section of CHA (which was then called HIA), and we would work our way through the shows, meeting and building friendships with manufacturers and publishers.  Julie has been hosting Scrapbook Soup, formerly known as Making Memories for about 13 years. She is very good at what she does and it was a pleasure getting to spend some time with her and catching up.

Pictured here are Julie and myself getting coached for our segment by Producer, Kathy Stull.  We have helpful staff taking pictures for us so we will have some to bring home and share.  The next picture is us figuring out just how we are going to present and in what order.
This set is SO packed with vibrant color, that you feel energized walking onto it!
Here we are, posing once again for the camera.  The series we filmed should be televised sometime in July and it will be available to view online as well.  The projects will be posted on the Scrapbook Soup website at that time complete with instructions and sources.  Our theme for CraZy TACKz was "wall decor".
Here is a guy that I found hanging around in the production area.  He was off set, just reminding us that it is all in fun and not to take yourself too seriously!  Max Headroom  has his own place of honor in the studio, so I had to get a snapshot with him!  I have a few more pictures to share.  Some highlights from my day at the studio!  Just a little peek at what goes on behind the scenes.  We had some comedians.....
The other Julie, somehow found time in her very busy hosting schedule to embellish her apron with a message in masking tape!  (Being the talented designer that she is...)  much to the chagrin of a Jet's fan on the production team.......
I don't think you will see any of this part on TV.  Good stuff, huh?

This is Amy with Julie on set.  Amy was featured with her product in the segment before mine.  She is the same age as my daughter and a lovely young woman.  A natural on camera and a beauty as well!  I love this picture of Julie and Amy.

My trip home was a long plane ride, but I got my three hours back when I got home!  I think I slept for about 15 hours straight, but I was all caught up by the day after I got home and back on track.

Thanks for letting me share my little adventure with you. Visit scrapbooksoup.com to view some past segments and get some great crafting ideas.  Thanks to the CraZy TACKz team for sending me to Cleveland and letting me share this great product!

Happy Crafting!

Marilyn
Design Consultant
for
CraZy TACKz
www.crazytackz.com
www.marilyngossett.com


Friday, April 13, 2012

Talent Showcase


Dear Friends,

I have started posting testimonials that tout the praises of the new patented product "CraZy TACKz".  I love seeing the innovative ways that people have found to use the "Tack with a Hook"!  To mix things up a little bit, I have asked Lisa Rojas, (pictured here), a professional designer in the Arts and Crafts industry, to think of how she might incorporate the CraZy TACKz into an original design.  Memory Wall Decor is a popular trend that becomes a useful piece of wall art when combined with the Tackz!


Lisa, aka the "Stampin' Queen" of Stampin' Queen Creations, has designed a decorative calendar with a very cool feature! Lisa is a busy designer member of the Craft and Hobby Association and was kind enough to share her inspiration with us! The CraZy TACKz are attached to the cork board, next to the calendar. Birthday reminders are written on paper die-cuts or punches with a grommet attached, and each are hung from the hook of the Tackz.  If you look at the bottom of the photo given, you will see three Tackz attached to the bird cage. These are there to hang keys, glasses, etc.  She used the basic, clear Tackz in this design.  These are my favorite because they can be embellished with glitter, paper punches, acrylic paint, etc.  For those less crafty, the clear Tackz work great as a basic piece of hardware!  They work in sheet rock and soft wood and you can see the wall through the Tackz stopper. There are four variations of the colored Tackz and you can see those on the website.


If you would like to see more about Lisa, visit her blog at www.stampinqueencreations.blogspot.com.  She is not only a talented designer, she is a great person with a warm heart!  On behalf of CraZy TACKz and the Team, I want to say a big THANK-YOU to Lisa for sharing her beautiful design with all of us! 

I will be in Cleveland for a couple of days next week to film a segment for a pbs program called Scrapbook Soup.  I will take some candid shots of the set and share them on the blog when I get back.  I am looking forward to visiting with more designer friends in the industry, which is the upside of adapting to a  3 hour time change!  (Which is NOT in my favor, by the way.....)

Wishing you sunshine, lollipops and rainbows!


Marilyn
Design Consultant
for
CraZy TACKz


Thursday, April 12, 2012

INSPIRING TESTIMONIALS FOR CraZy TACKz!


Dear Friends,

I have been collecting success stories from satisfied CraZy TACKz customers.  I will be sharing one from time to time.  Here is our VERY FIRST!
I received this good report from Donna Zeeb,
(she is pictured on the left.) 
Donna wrote:  "If you haven't tried "CrazyTackz" you need to order a supply!  They come in SO handy in a multitude of projects!  Recently I painted a bench for my front porch.  It has a heart cut out on the back of the bench and I wanted to add a touch of Spring with a beaded floral vine.  Didn't want to glue it on as I want to change it seasonally, so CrazyTackz to the rescue….I was able to just push them in the pine wood with ease, hook the vine around the "CrazyTackz" hook and shape it to enhance the heart shape!  Perfect!  As the seasons change will be able to embellish the heart with many other ideas, no glue mess to clean up or repainting of the bench!"


She went on to say: 
"I have an idea for a wall grouping of a collection of frames, thinking "vintage" look.  Will cover a piece of foam board with some coordinating fabrics for my bedroom wall and add embellished  Crazy Tackz to hang all my favorite necklaces for a look of "Vintage", but also to keep them at my finger tips and untangled!  Will try to get it done by month end….have the perfect wall space that needs an updated look! "I will send a photo as soon as I get it completed….going shopping for frames later this week.  Thinking probably 7 different frames/ sizes….Craft Warehouse has such fabulous fabrics, think I will go there and do a variety of them! I am inspired by the website….partly responsible for the "necklace" idea….I hope this helps to inspire others to try CrazyTackz, what a GREAT new product!!!"

 Basic, Clear, CraZy TACKz used to secure this vine to the bench. 
Look for the orange package!

Do YOU have a CraZy TACKz story?  If so, we would love to hear it! 
If you are wondering where to find and purchase CraZy TACKz, they are in Bi-Mart, Ben Franklins, Craft Warehouses, Petersen/Arne, Distributor; will be in lots more stores very soon...will keep you posted!  You can purchase on the website for the time being, www.crazytackz.com.

I will feature more testimonies in the days to come.  If you have any questions, please drop me a line!

Happy Crafting!

Marilyn
Design Consultant
for
CraZy TACKz


Monday, April 9, 2012

More Springtime Crafts!

Hello Friends!

We are one day past Easter and on our third (yes, THIRD) day of sunshine!
This is a big deal here in the Pacific Northwest.  We have had a lot of rain, late snow, more rain....and we are ready for SUNSHINE.  I don't know how long it will last, but it is really good for now. 

I have been working on some new wall hangings, using the CraZy TACKz.  I promised to keep the ideas coming, and this one is fun and easy.  Once you see how it is made, I believe you can adapt it to any room in the house.  The two projects I am showing today feature "felt" by CPE (found in craft stores across the country) and 12" foam wall mounts by http://www.smoothfoam.com/.


This project is made with a 12" square foam base, black felt, and polka-dot 12" memory paper.  The felt is cut about 2" larger than the foam square on all sides.  The felt corners are mitred, pulled over the foam corners and glued to the wrong side.  The edges are all pulled up and are also glued to the "back" of the foam board. 

I cut 1/2" off of each side of the paper with a paper cutter so it measures 11" square.  This allows a 1" border of felt to show around the paper. Adhere the paper to the board, right sides facing up.

One ribbon length was cut with 2" extra, measured from corner to corner (top left and bottom right). The excess was glued to the back of each corner. Refer to the photo given to glue the ribbon to the opposite side and to the middle as shown.  For the ribbon hanger:  Glue the ends (tails) of a ribbon hanger to the top (wrong side) of the wall hanging, the loop extending above the board.
Finish:  Glue an 11" square of felt to the back of the foam square to conceal the unfinished edges. 
Flowers:  Use various sizes of flower paper punches, or use a personal die-cut machine to cut out flowers.  Make one flower by layering with the largest piece on the bottom, to the smallest flower on the top.  Punch a hole in the middle of the layered flower, using a 1/16" paper hole punch.  Poke a Tackz through the hole; glue to the flower to secure.  Refer to the photo given and attach the flowers to the board by poking into the foam.  Secure with a spot of glue.  Repeat for each flower.

The following photo is a variation of the first design.  This project was put together with a foam wall mount and felt.  There was a zebra design on the felt, so no paper was applied.  All other steps are the same.


Pictured above is a closer look at the paper flowers.  Glitter was applied to the CraZy TACKz before they were inserted in the board via the flowers.

I hope this gives you some inspiration.  If you have any questions about either project, please contact me via this post!  I will be happy to answer any questions as it is my desire that you have success and enjoy your crafting experience!

Visit our website for more crafting ideas.  The blog will feature new designs on a regular basis.  Y'all come back now!

Happy Crafting!

Marilyn
Design Consultant
for
CraZy TACKz