Monday, July 1, 2013

Creative Hearts Workshop - July 2013


Happy July!  


This is the month that we celebrate our nation's freedom and the big day will be here very shortly!  Sometimes we tend to take things for granted, and since it is on my mind, I just want to say how much I love and appreciate the brave men and women that make it possible for us to stay free.  I, for one, have lived a blessed life. Being a "Baby Boomer" I was born in a time of peace, but then came the Vietnam war, the assassination of President Kennedy and the turbulent 60's.  In spite of all that, there was always the underlying rock of respect for our elders and teachers, fear (love) of God, and a great work ethic..(you don't work, you don't eat).  It was a simpler time, and though not perfect, I have lots of good memories that can be calming as changing winds blow in this fast paced world we now live in.

So!  I am  stepping down from my soap box and I will get on with what I came on here to blog about today.  I hold a workshop once a month, each featuring a paper collection from Close To My Heart.  I love the fact that the collections are all picked out with matching embellishments and all I have to do is order and create!  The new catalog was just revealed at this year's convention and there are some exciting new things to be introduced by August. I will be sharing more about those later!  (Excited!)

Tommy papers are being featured in my July workshop.  I created a set of four cards that will fit nicely in a matching decoupaged wooden box.  The Tommy papers are a nautical theme, perfect for Summer.

The dimensional embellishments on the cards are fashioned by adhering the canvas stickers to cardstock then cutting each out, leaving a 1/8" border.  I used dimensional adhesive dots to give a 3-D effect.  So bright and cheery!

1.


2.


3.


4.


I hope to see my usual bunch at the workshop! Thank you for stopping by.  If you ever have any questions, please feel free to message me.  I am happy to share!


HAVE A HAPPY 4TH OF JULY!

Marilyn

"Hook it Up" with CraZy TACKz!

Sunday, June 2, 2013

HAPPINESS IS HOMEMADE....


Hello, Friends!


Our theme for our Designer Craft Connection this month is "Happiness is Homemade".  I couldn't think of just one thing that is a happy thing because there are so many!  So, I decided to share a little about where my happiness begins, and some of the things that keep me happy!  I perused through my blog library of photos and came up with a collage of photos that aptly describe Homemade Happiness for me!
The picture below was taken about a year ago of me in my home studio.  Everything is pretty much the same, but my hair is a little darker.   I spend a lot of hours in this room and day or night you can probably find me in here!


See my clock on the wall ? Well, right next to it, to the left, I have been going to put a black and white striped semi-circular awning...above my computer area, to go with striped awnings over my high windows.  This was the intent when I painted my studio light pink....and I just haven't got it done yet!  When I do, I will be sure to post a picture and show it all off!  That will make me happy!


The kitty you see below is Buffy.  She is a fixture in my studio and was after my computer mouse when I took this picture!  Lol.  Being an indoor cat, she doesn't have a lot to keep her from getting bored, but she does like to lick plastic bags for some reason!  The only thing I can figure is that we had catnip in one when she was a kitten and she used to get into it!


Another thing that makes me happy this time of year are the passion flowers that grow in my yard.  They fill up with blooms that last for about three days each.  Then, they close up into a pod and dry up.  I discovered that if you open up the pod, something resembling a fairy pops up.  


This discovery inspired me to create some rubber stamps...and I have a couple of the images shown below.
Did I mention I like to draw too?  Makes me happy!  


Ok....I have a couple of more things that bring happiness into my world.....
I love to make dolls!  I don't get to make them from fabric much anymore, because I have other things that take my time. Below are a couple of larger sitting fairy dolls that I created a few years ago.  One of them is in someone else's home now, but the one on the left still keeps me company.


This mama duck and her brood was in our back yard one day.  How fun to get to watch them run around before she decided to take them back home across the street.  We have lots of geese and ducks living on the golf course across the street.  (Not a busy street, mind you...)


One day, I heard a swooshing noise outside of my studio window.  I looked out of the top window...and this is what I saw!  I took this picture through the glass, but it still came out pretty clear!  That was a happy moment!  I wonder who was in the basket.....


See this black kitty?  His name is Terror.  He belongs to my daughter and he likes to come visit me while I am working too.  He is a little more notorious about getting up in my stuff....but he is pretty cute, so I usually let him hang out for a while!


 Now the next picture is my little buddy, Tucker.  He lays claim to the family at large, but he is definitely my little sidekick!  He loves his mom, and I must admit,he is a sweet, fuzzy little dog and I love him too!  He has a couple of hang-outs in my studio.  His kennel, and the closet.  The latter is his favorite spot when I am home with him.

Here he is chillin' on a warm day after playing in the yard.


This is Kooky, the craft lady!  She would want me to thank you for stopping by and taking the time to let me share some of my Homemade Happiness with you!  Hopefully you will get some inspiration going through our Blog Hop today.  Just click on the blue DCC button to go forward or backward and check out some more Designer blogs! 


HAPPY DAY!

Marilyn

Monday, May 27, 2013

Angels....Verdigris, Rusty Metal and Marble....a cinch to create!


Hello, friends!

A few years back (quite a few in fact.....), I designed a craft book called "Rusty Tin Wood".  It featured painting techniques on wood that made it look like some of the rusty tin that was so popular at the time.  Recently, when coming up with a design for  a monthly Smoothfoam Blog that I contribute to, I thought of this painting technique and applied it to the lightweight foam I was working with.  These angels are reminiscent of something that would be made out of concrete block or solid metal.  I used craft supplies that I had on hand to embellish each project and you can make it very simple or elaborate, depending on your taste!

If you would like the instructions for these projects, you can go to the Smoothfoam Blog at
http://www.smoothfoam.com/blog/author/marilyngossett/
Take a look around while you are on the site.  Our design team has found some impressive ways to use Smoothfoam!  You will find a variety of inspiration!


Verdigris


Rusty Metal


Marble


Thank you for stopping by!  I always love to hear from you too!


HAPPY CRAFTING &
A somber salute to all of our fallen heroes
this Memorial Day, 2013!

Marilyn


Monday, May 6, 2013

HANDMADE WISHES!  

Springtime is here; Summer is soon to follow. Birthdays and 4th of July are special events deserving of a banner to shout out our best wishes for a great celebration! Below are two examples and inspirations for celebrating by giving a "shout out" with die-cut banners.


For the Birthday banner, I chose five shades of cardstock and layered the background with two; then mixed up the remaining three colors for the letters.  You can cut the letters as big as you like and then cut out the background papers accordingly.  I have noticed that many Cricut cartridges have a cupcake design and you can top the cupcake with a heart, cherry, berry, or mix it up with something to match the birthday theme.


For the 4th of July banner, I cut little strips of paper and glued one to the top edge of each letter.  Each strip was then folded into a loop over the cording and adhered to the back of the letter to secure.  The little paper hooks were included with the die-cut I used for the stars, but you can substitute ribbons for the paper hooks.


To hang up my banners, I use CraZy TACKz.  They are available at many craft stores and online at www.crazytackz.com. You can pin a die-cut behind the tackz, then use the hook to hang ribbons and balloons. The blue pack contains red, white and blue stars.  Perfect for the 4th of July celebrations!

Hope you are enjoying this time of year.  I have visions of picnics and outdoor parties dancing through my head!  Wishing for you some great times in the sunshine!


HAPPY CRAFTING,

MARILYN


Wednesday, April 24, 2013

Pop of Color to Celebrate Spring!


SMOOTHFOAM BIRDS FOR ALL SEASONS!

nested bird smoothfoam


Supplies for 2 birds – one large, one small:
Two 2″ Smoothfoam balls
2-1/2″ Smoothfoam ball
1-1/2″ Smoothfoam ball
Any size Smoothfoam sheet
Acrylic crafts paint: Yellow, Black, White, Orange
3/4″ teardrop wood shape
Jute twine
Two black rhinestones
Yellow craft feathers
Toothpicks
Serrated craft knife and scissors
Glue gun and low melt glue sticks
Craft glue
Sand paper
Water and paper towels
Powder blush
Optional: 12″ wood dowel, silk flowers, greens and berries, glitter
1.  For each bird, cut the bottom portion off of the bird’s body (larger ball) and head (smaller ball) to allow for a flat surface on each. Lightly sand the foam edges to smooth.
2.  Cut a triangle shape from the Smoothfoam sheet using a serrated knife. Cut the point off one end to create a flat surface that will fit against the body. Turn onto one side and sllice this piece in two, reducing the thickness.
spring birds smoothfoam
3. Poke a toothpick into the flat side of each foam ball and into the end of the tail piece. Paint both balls and the tail yellow, using toothpick as a holder. Place into the foam sheet and allow to dry.
4. Adhere the head and tail to the body with the toothpicks. Paint black wings on the sides of the body as shown. First outline each wing with a brush, then fill in the color.  Paint a black strip on the top of the head. Highlight each cheek with some powder blush and a white paint dot, then highlight each wing with a little float of white paint.
5. Paint the wood teardrop black and allow to dry. Gently push the pointed end into the spot where the beak will be placed to create an opening. Push the rounded portion of the teardrop into the opening and adhere with glue. Adhere the black rhinestones to the face for eyes.
6. Choose a couple of feathers for the tail and trim as needed. Poke a small hole in the top of one bird’s head with a toothpick and glue a piece of feather into the hole.
7. Wrap and glue jute twine around the bottom portion of the bird’s body.  For a simple nest design, leave plain. For a floral nest, cut pieces from a spray of silk flowers, berries, etc. and glue into the jute. A dowel or wire can be inserted into the flat side of the bird if you would like to display it in a plant.
Below is another design option with glitter that I love!


blue glitter bird smoothfoam

You can find Smoothfoam at your local Michael's Store!

Hope you are enjoying everything new that comes with Spring!

Happy Crafting!

Marilyn

Thursday, March 21, 2013

A little bit of EASTER!

 
Hello there!  It is still March, but Easter is pulling a fast one this month and will be here on the 31st.  I am ready!  Are you?


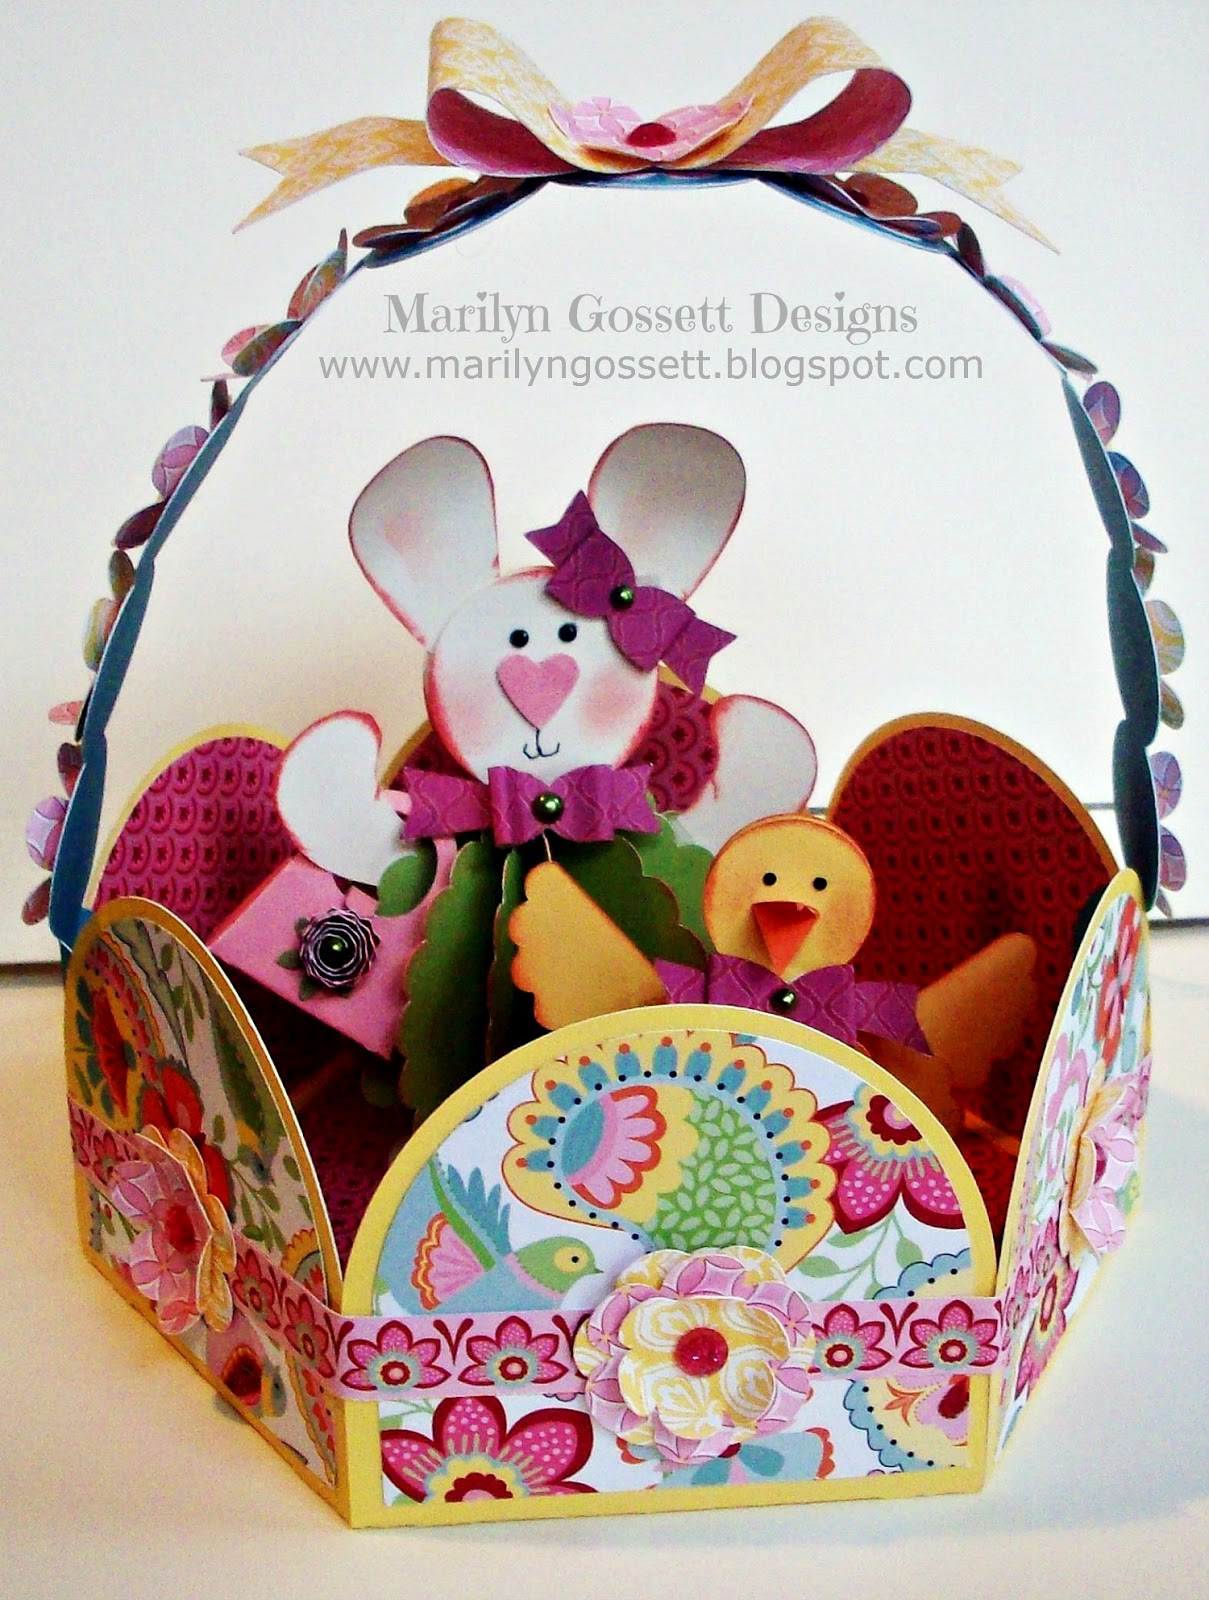
My Workshop for this month was an Easter Basket with Bunnies and Chicks.  I decided to do a re-make of the baskets for Easter dinner favors and made them much smaller than my original basket that is shown above.
 
I found some embellishments by K & Company (I love their products), and put them on the top of the bow of my basket handle.  They added the perfect touch.  The embellishments are about an inch in diameter, so you can see how big the baskets are, relative to that.  CTMH also has some Chantilly button embellishments that would be perfect for this project.
 
I used my Close To My Heart Cricut cartridge.  There are two, (Art Philosophy & Artiste) and the patterns here are found on the "Artiste" cartridge.  I have not even touched my other cartridges since I got these.  I highly recommend "Artiste" and if you would happen to want one, you can take a look at them from the CTMH widget on the side of this blog.  I guarantee, you will love it!  (These cartridges come with chipboard punch-outs and rubber stamps too!)
 
I will be happy to share the dimensions of the Cricut cuts used here if you would like.  Just drop me a line and let me know!
 
Following are some pics of the mini baskets.  I will be heading to the store soon to find some cute and delicious little chocolates to put in them.  I am thinking some cute wrapped bunnies, lambs and chicks and some eggs.  Belgium chocolate would be great!


So there are several different views.  I am making enough to give one to everyone at dinner.  I made some little 1" chicks to go with them.  Each one will be holding an Easter greeting attached to its' wing.  I am looking forward to sharing these with our family and friends.  If you don't get some done by Easter, they will be perfect for May Day!
 
Hope you are enjoying the first days of Spring.  I always look forward to this time of year when everything is rich with color and a fresh outlook.


Happy Easter &
Happy Crafting!
 
Marilyn


Monday, March 4, 2013

A FAVORITE CRAFT TECHNIQUE

Today is the first Monday of the month, and the posting day for the Designer Craft Connection!  If you are not familiar, this is a group of designers that belong to the Craft & Hobby Association and we post a project pertaining to a different theme each month.  Look for the blue DCC widget to the right of my post and click on it to go forward or backward to view the work of our other contributing designers.
 
The theme for this month is "A Favorite Craft Technique".  I have lots of favorites, but decided to post pictures of some cards that I created a little more than few years ago (2006!).  This was my one and only iris folding binge, but I would like to work on some designs again when I get time.  I was unaware of this technique until my little sister introduced me to it and she doesn't even consider herself a crafter!  What is it, you ask?
It is a technique that I think has been around for quite a while, called "Iris Folding". Instruction for this technique can be searched and found online, but here are a few examples of my creations.
 
I got a little carried away once I learned the technique and came up with different patterns to experiment with.  Once I was done playing, I had a pretty good collection of artsy cards.


Once the pattern is cut out of the card stock, it is filled up with folded paper strips filling up the image until there is just a little opening in the middle of the image.  That is called the "iris", as in the iris of an eye.  I placed a pretty piece of paper behind the iris on most if not all of my cards.  If the "iris" is left open enough, it can also frame a photograph.  I tried this out with geometric shapes and it worked well.  This technique can also be applied to scrapbook lay-outs for a special touch.


Here is an example of a geometric shape, and the opening was the "iris", large enough for a photo.

Well, this is about all I have to share for today.  I hope you are inspired to go and create, maybe trying something new!

 
Happy Crafting!
 
Marilyn
 
P.S.   When you see highlighted words in my Blog, no need to click on them!  Blogger has seen fit to slip pop-ups into my text box and I do not know how to get them out!  They are just ads that do not apply to anything else on this blog.   Thanks!