Friday, July 31, 2015

Etchall for Halloween Gift Giving and Decorating!


TRICK OR TREAT!  Do you like to give special treats to your friends and family for Fall and Halloween?  These bottles are craft store finds and were very inexpensive.  A little Etchall, some cardstock, stamps, inks and ribbon transformed them into spooky little containers perfect for holding sweet treats!  I can't wait to treat my friends with them.


To get started, I gathered my supplies.

etchall Glass and Mirror Etching Cream
etchall etchmask
Detail Pick Tool
Squeegee
Cardstock papers:  Orange, Black, Brown
Halloween themed rubber stamps and ink
Inks:  StazOn Brown, Black and White
Wedge sponge
Die cutting machine and Halloween shaped dies:  Use the negative image for the spider and skull
Crown pins
Scraps of ribbon and lace in black and white (or cream)
Painter's tape
Bottles:  3 in various shapes and sizes, the tallest about 6" high.


Remove the corks from the bottles. Wash and dry thoroughly; removing any sticky labels.

Measure the surface of the bottle.  Cut out design on the die-cut machine.  For the skull and bones; use the reverse image as shown below.  Use the painter's tape to protect the bottle from excess etching creme.


Lay the bottle flat and liberally apply the etching creme.  Let it sit for 15 minutes.  Check to make sure the creme is not sliding onto the glass where you don't want it to go.  When the 15 minutes is up; remove the excess creme with the squeegee and put it back in the bottle to use on another day.  It can turn the darkest shade of brown and it will still be good to go!


Wash the residual etching creme off of the bottle.  Remove all of the etchmask; rinse again and dry.
Place the corks back in the bottles.


Using the sponge, apply black StazOn Ink to the spider.  The etched design will have "tooth" to hold the ink.  I used White for the skull and bones and for the spider web.  Use a clean rag to wipe each bottle clean to remove any excess ink.


I used the die-cut machine to cut out the tags.  I stamped on the cream colored cardstock with brown ink.  I cut out a second slightly larger tag and adhered the first one to the background piece.  
Poke one crown pin through a tag so the saying shows. Stick it in the cork.  Repeat for the others. 
Tie a piece of ribbon around the neck of each bottle.


Now, the fun part is filling these up with colored candies and giving them to my friends and family for Trick-Or-Treat.  If you are like I am, you will need to get a head start to make sure you don't miss it altogether!

The etchall products were kindly provided for me to use by B & B products.  I hope you got some inspiration here today.  If you would like to watch a tutorial on etching, you can go to the official website at http://etchall.com/ and Barbee has provided a great tutorial to get us going.


I hope you enjoy the small blessings you find along the way and
Live Life with a Flourish!

Marilyn


Wednesday, July 22, 2015

Christmas in July! Robin's Nest/Smoothfoam Product Challenge


Just when you finally got settled into Summer; here comes Christmas in July!  

My project is a Christmas themed birdhouse and a greeting card idea as a "bonus" project.

You will need:
Robin's Nest:  Christmas papers, flat backed beads (Links to Christmas papers at bottom of post)
Smoothfoam:  6" x 12" x 1" sheet, 2
Hot wire foam cutter  (Marvy)
Electronic cutting machine & cartridge with tree
Paper Punch:  scalloped circle; 1" circle
Scissors
Adhesives:  Glue gun, Tacky Glue
Ruler
Inkpad:  White
Wedge Sponge


1.  Gather supplies.

2.  Birdhouse:  Refer to the photos given and cut the point off of each upper corner from one Smoothfoam rectangle.  Measure and cut a roof from the second sheet of Smoothfoam.

3.  Lay the birdhouse onto the wrong side of the memory paper and trace around it with a pencil.  Cut out.  Adhere the paper to the matching Smoothfoam piece.  Repeat for the roof.

4.  Cut 1" x 12"  strips of contrasting paper and glue around all of the edges to conceal the Smoothfoam.  I used red glitter paper for the roof.

5.  Cut the door and bottom ledge using scraps of the Smoothfoam.  Refer to the photo below. Cut and glue the paper to the Smoothfoam.  Position and adhere the roof, door and bottom ledge to the house. (photo below)

6. Trees:  Cut out four trees, two slightly smaller than the other two.  Sponge the edges with the white ink.

7.  Die cut or punch out the scalloped circle.  Adhere a 1" circle of the green and red dot paper to the center of the scalloped circle. Arrange and glue flat side of beads to the circle in the shape of a star.


Use scraps of Smoothfoam to add dimension between the outer trees and the birdhouse.  Use another Smoothfoam scrap to adhere the scalloped circle to the birdhouse as shown. Further embellish with beads and words.


Cut out the packages from the memory paper.  Adhere to the front of the birdhouse.


Below is a little bonus project.  I created a 4-1/4" x 5-1/2" greeting card with the paper and beads I had left.

Enjoy!


Click on the blue Designer Craft Connection button at the top of the page to go forward or backward on the hop.  There are lots more fun Christmas projects to see! 

And....there's more!  Everyone likes a give-away!
Enter the give-away by commenting on any of the designers blogs!


Below are the links to the papers I used.  To see all of the Christmas products, here is the link!


Monday, July 13, 2015

Back to School with Deflecto


 Around the early part of August, we start thinking about school again!  That means it is time to start shopping for school supplies!  Yay!
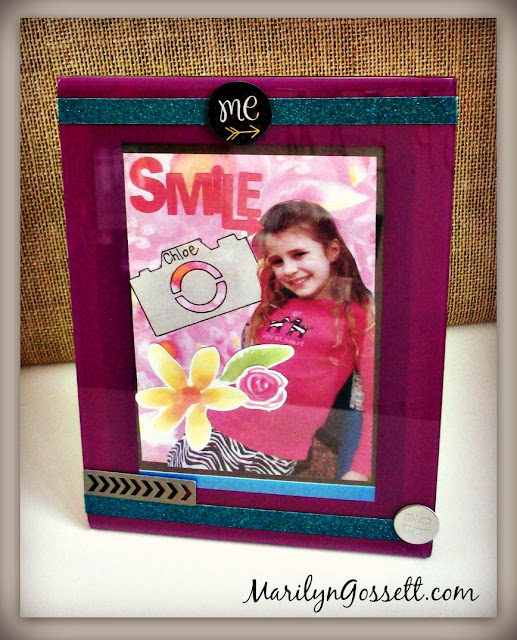
Kids are starting kindergarten and the first grade, high school and college!  Deflecto has great basics for desk top, storage and lots more! I started with a pencil holder, dark pink frame and a plastic pouch.
Would you like to join me in decorating these with your favorite back to school theme?  I chose girly papers and embellishments for these projects, but you can decorate them in any way that you can imagine.

I used coordinated papers, glitter adhesive tape, dimensional Complement stickers, and some mulberry flowers.  Just measure, cut and apply with adhesives of your choice.  I used adhesive double stick tape for my projects.


This is how the pencil holder looked before I decorated it!

Check out Deflecto's website for office, storage products and more!  Here is the link:


Hope you got a little inspiration here today.  Luckily it isn't August yet and we still have plenty of Summer left!  I am sure we will all be more ready for school to start by the time it rolls around.


Take time to enjoy the small blessings along the way, and
Life Life with a Flourish!

Marilyn


Monday, July 6, 2015

Crafting on Vacation? The only way to fly!


How do you like to spend vacation?  When you get a little down-time from all of the vacation activities, do you still like to keep busy with something fun?  I sure do!  I never leave home without a bag full of papers, scissors, adhesives and the like!  I prefer to work on small projects that don't take up a lot of space.  I like the challenge of seeing what I can come up with; not needing a lot of anything!

The project I am featuring is one of a bunch of mini albums I have made.  I cut out the papers before leaving home, and threw in papers with matching chipboard die-cuts, ribbons, paper clips and a few other embellishments.  I will also take along a paper punch or two if I can give it a lot of use with my papers.


Here is a shot of the mini-album from the inside.  I put in some little pockets, various paper punches, die-cuts and made some cute flower paper clips.  For the flowers shown here; I cut various sized pieces from paper scraps.  I will cut one in a spiral, then roll it up into a flower. Finish by applying glue to the little circle left at the base of the spiral.  This will hold the flower in place.  I then glued the flower to a scalloped circle of cardstock.


I glued punched out tabs to the top of several pages.  Small ring binders hold the album together.  I embellished the ring binders with some ribbon and a key charm.


I have a special place in my studio that I like to hang my colorful and various themed mini-albums.  I decorated a wooden shelf and used some  handy "tacks with a hook" called CraZy TACKz to hang the albums on.  It is a favorite of mine as each little album has a different theme and different colors.  I couldn't find a very clear photo of the display shelf, but the photo below will give you an idea.


There is an arrow pointing out a similar album to the one I am showing here today.  Sometimes I will give one away and then replace it.  The pages are little pockets in most of the mini albums shown here.  It is fun to fill them with little mementos and photos that have a special meaning for the recipient.  My vacation journal will have some special memories crafted into it's pages.

I hope you got a little vacation  inspiration here today.  Click on the blue Designer Craft Connections button to go forward or backward on our blog hop today.  Our theme has been Crafting on Vacation.  If you are like me, you won't leave home without a few supplies for when inspiration strikes!

Take time to enjoy the small blessings along the way and
Live Life with a Flourish!

Marilyn