Thursday, January 15, 2015

The little lemon that just "couldn't"!


The last night of CHA I met with a couple of designer pals that have been working the industry for years.  We always have fun when we are together and there are always a lot of laughs.  Before we parted ways, Jean Keivlan gave us each a huge, lovely lemon from her sister's place in Phoenix and presented it with a "craft challenge".  We each took our lemon, packed it in our suitcase and brought it home with us.  Mine has traveled all the way to Oregon and as you will see, he got quite a scare!


Poor little lemon!  He shouldn't have worried.  He is stems and skin above the others of his kind!


I don't think he felt too bad until he started looking around at his surroundings....


I could never cut a lemon with a face on it!  He is a lovely lemon and I am going to keep him until he gets old and shrivels up.  Did you know that lemons actually grow hair when they get old?  Yes, the growth pattern is very random and each one is different.  Unfortunately, at this stage they are totally beyond making lemonade so they usually will go into the compost pile and help something else to grow.

Thanks Jean for the fun lemon challenge.  I am waiting now to see what Julie and Madeline have done with their little house guests.  And Jean, I think you should do one too!  

Take time to make some lemonade & Happy Crafting!

Life Life with a Flourish,

Marilyn


Chalk board signage by Deflecto.  Check out the new site @

Monday, January 5, 2015

A new use for an old product!

Do you know what you are looking at in the photo above?  There is a good chance you do, but just don't know it yet!  What is it, you ask?  You have seen these in just about every store you have entered and maybe beyond.  They are the clear plastic pouches that you generally see holding a price tag!

These are clear plastic pouches made by Deflecto, LLC.  Deflecto is a manufacturer of office supplies and there is a good chance that the acrylic organizing products you might see in the office supply stores were made by them.  They have joined the world of crafts and are showing at CHA in Anaheim this month for the second time.  I have the pleasure of being on a design team that are taking their products out of the standard office supply realm on into the multi-media world of CRAFTS!    If you are attending the show this year, be sure and stop by and say Hello!  Booth 2375.


I used Close to My Heart papers and embellishments called "Brushed". www.marilyngossettdesigns.ctmh.com/retail  It is very colorful and fun for all seasons.  For one pouch, I cut the paper about 2-5/8" x 10-1/2".  Fold in in two.  Slip one half into the pouch leaving the other half out. The ribbon is stapled to the piece that is "out" of the pouch.  This is the page that I stapled the piece of ribbon to.  It helps in turning the pages and adds some extra decoration.  You now have one page you can touch and feel to place mementos and dimensional items.  The pocket is perfect for protecting your scrapbooked photos, etc.  

Here are some more photos of the mini album with the pages open so you can see how I arranged it.


The pear clip that is commonly "paired" (no pun intended...) with the plastic pouch is holding all of the pages together.  I embellished it with lots of ribbon.

If you would like to find out where Deflecto products are sold, go to their website and look for retailers at
http://www.deflecto.com/craft/ 

To see the next project, click on the blue Designer Craft Connection button and have fun checking out what our other designers have to show!

Live Life with a Flourish!

Marilyn


Thursday, January 1, 2015

Steampunk Christmas Ball

Supplies:

Smoothfoam:  3" ball
Offray ribbon:  one yard of 2" wide sheer gold wire edge; 1/2 yard if 1/4" white
Decou-Page Gloss medium by DecoArt;
Metallic Lustre by DecoArt:  Black Shimmer, Copper Kettle
Small rag for applying Metallic Lustre
Tissue paper:  Metallic gold; one piece
1" flat paintbrush
metallic gold chenille stem; 1
Embellishments:  self-adhesive rhinestone trim, metal gears, metallic beads, gold bead caps, clear rhinestones
straight pins
Adhesives:  glue gun and fast grab tacky glue
scissors
water container, paper towels, paper plate
wooden skewer (handle)
straight pins

Instructions:

1.  Gather supplies.  Insert the wooden skewer into the ball to use as a handle.

2.  Crumple the tissue paper.   Spread it back out and tear into fairly small random pieces.  Apply                      decoupage medium to a small area of the ball and adhere a piece of crumpled tissue paper.  Apply more        medium to the top of the paper.  Repeat until the entire ball is covered.  Allow to dry thoroughly.


3.  Adhere the rhinestone trim around the middle of the ball.  Place and adhere the embellishments to the ball      as shown in the photo given.


4.  To reinforce the hold on some embellishments i.e. beads, use a straight pin to secure to the ball.

5:  Bow & Hanger:  Make a loopy bow with four 2" loops and two 2-1/2" tails.  Trim a V into each tail.
     Tie the 1/4" ribbon around the middle of the bow to secure it.  Match the ribbon tails and tie the ends in a      knot, leaving a 3" loop.  Trim the tails at an angle.


*Designer tip:  Look through your junk drawer, buttons and beads for old keys, metal buttons, etc.  These items all lend to the effect of Steampunk.  Use the metallic wax to give depth and definition to your ornament.
I like Metallic Lustre by DecoArt.

Enjoy & have a very Merry Christmas!

Life Life with a Flourish,

Marilyn


PS.  Here we are on our annual trek to our favorite tree farm.  We always pick out two trees.  It might be            just one next year.  It is taking longer and longer to get everything decorated!  


Wishing you love, joy and many blessings this holiday season and in the coming year!  Merry Christmas & a Happy New Year!


Peace on earth and goodwill to men!


Wednesday, December 10, 2014

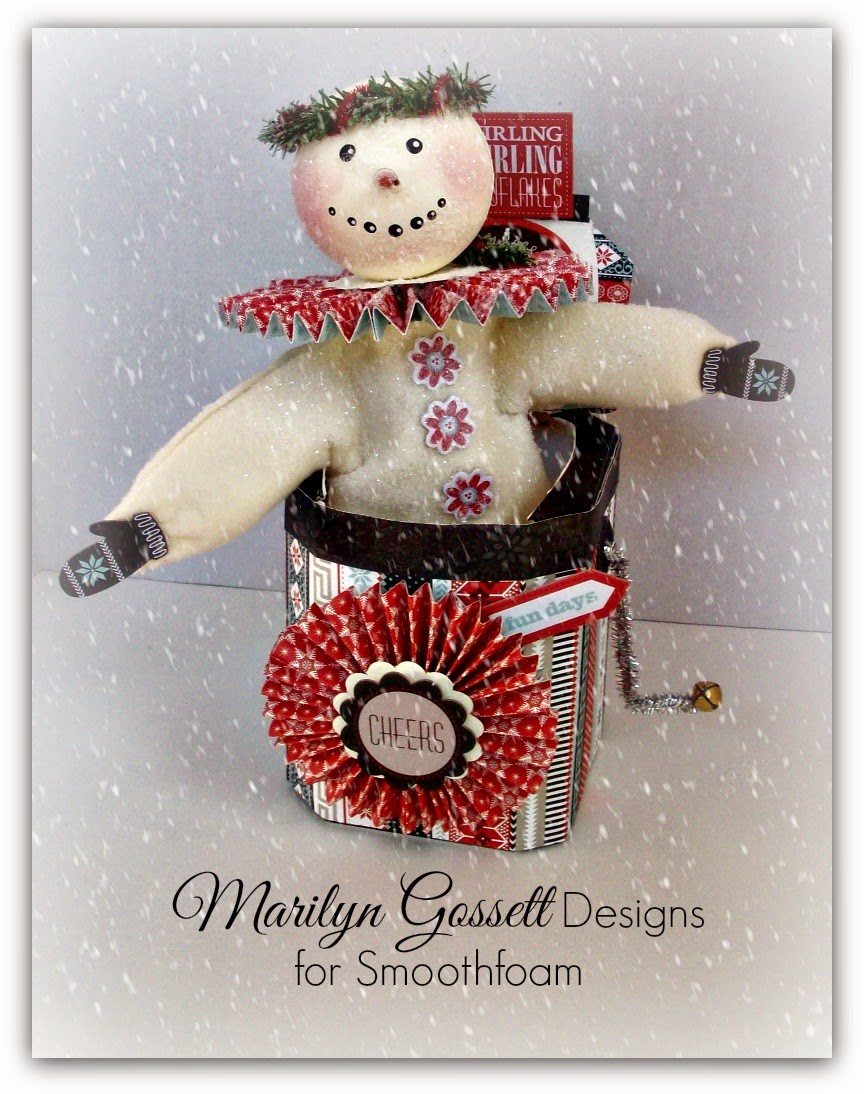
Jack-in-the-Box Snowman


Do you like to recycle?  I have a hard time throwing things in the trash sometimes.  Even into the recycle bin! For example; the little K-cups after they are used.  I know there has got to be a really cool craft project lurking there, but don't take the time to figure one out.  The box was another story.  I used the 2.0 carafe k-cup box to complete this project.  It could be another box with a flap; but this one was deep enough and worked nicely.  Following is the supply list for this project.  Hope you enjoy it!

Supplies:

Smoothfoam:  3" ball
Cardstock papers:  Snowhaven papers and Complements by Close To My Heart  To order:  www.marilyngossettdesigns.ctmh.com/retail
Acrylic paints:  Americana Decor Chalky Finish: Whisper; Americana Acrylics:  Lamp (Ebony) Black, Spiced Pumpkin, Warm White by DecoArt
Americana Decou-Page for paper by DecoArt
Felt:  Vintage White; 2 sheets
Paper Punch:  1-1/2" Scallop
Chenille Stems:  one silver metallic, one red metallic, one pine
Jingle Bell: one 1/2"
Fiber Fill
Diamond Glitter
Wire cutters (for cutting chenille stems)
Powder Blush
Scissors
Paintbrushes
Stylus
Wood Chop Stick with pointed end
Glue gun
other adhesives
*Pattern for the Body/Snow Suit


Instructions:

1.  Box:  Measure the height of the box.  Cut out 12" paper to fit the box and lid.  Adhere papers to the box & lid using the Decou-Page.

2.  Snowman (Jack-in-the-Box):  Using the wooden skewer for a handle, poke the pointed end into the Smoothfoam ball.  Paint entire ball with Whisper Chalky Paint.  Let dry.
Face:  Apply black dip dots for the eyes and mouth.  Blush the cheeks with powder blush.  Rub in with your finger.  Highlight the eyes and mouth with tiny White dip dots.  Allow to dry.


3.  Nose:  Remove the skewer.  Paint the pointed end orange.  Cut 2" from the pointed end.  Insert and glue into the face as shown.  Replace the remaining skewer into the pilot hole in the head.  This will secure the head in the body portion of the snowman.


4.  Body/Snow Suit:  Fold one rectangle of felt in two along the long edge.  Use the pattern given and cut out one.  Repeat with the remaining sheet of felt.  Glue all the edges together; leaving an opening for the head.  Turn the suit right side out, hiding the seams. Lightly stuff  from the bottom with fiber-fill.  Lightly stuff the sleeves with the arms extended.

5.  For a rosette:  Cut three 2" x 12" pieces of paper.  Accordion fold every half inch for each piece. It works best to score them before folding. Adhere the edges, making into one piece.  Gather the folded papers into a circle, securing by holding it down, in place.  Adhere a scalloped paper circle to cover the hole in the middle to secure the rosette.  Repeat on the opposite side.  Make one rosette for the front of the box and one for the snowman's collar. The glue gun works best for this step.

6.  Assemble:  Make a pilot hole in one rosette (collar).  Poke skewer through the rosette and neck opening  into the body suit.  Apply glitter to the head, rosette collar and snow suit.  Shake off excess.  Place in the box with the arms extended as shown in the photo given. Crank Handle:  Bend the silver metallic stem in two.  Shape into a handle and glue the jingle bell onto the bent end.  Make a pilot hole in the middle of a 1" circle.  Push the ends of the stem 1/2" to the back side of the circle and bend out like a brad.  Adhere to the side of the box.

7. Finish: Halo:  Loosely twist the red metallic stem around the pine stem.   Make a circle to fit around the head and twist the pine ends together to secure.  Adhere to the head.  Glue a piece of pine stem to the collar for added decoration.  Use the Close To My Heart Snowhaven Complements www.marilyngossettdesigns.ctmh.com/retail to embellish the snowman with mittens, buttons on front, and signs.  *Designer tip:  Use Cricut machine or paper punches to cut embellishments if you don't have access to the die-cut Complements. Rubber stamps will work for the sayings. Glue the second rosette to the front of the box and embellish with die-cut sayings.  


Now enjoy an adorable Christmas decoration that can stay out through January!


Enjoy every ambiance of the Holidays and

Live Life with a Flourish!

Marilyn


Monday, December 1, 2014

SHARING SOME HOLIDAY DECORATING!


Happy December!  Are you up to your armpits in Christmas decorations?  I know I should be, but we relaxed over the long Thanksgiving week-end, so next week-end will be our traditional trek to the tree farm.  In the meantime, I have been playing with some decorating ideas.  I wanted to see what I could come up with using papers and my die-cutting machine.  This snowflake themed garland and snowmen were one of the creations I came up with.  I thought it might spark some creative ideas in you, as it can be created in traditional colors and different shapes! 

I used boa garland, bead trim, cardstock and my die-cutting machine with a winter themed cartridge.  The snowflakes and snowmen are embellished with flat metallic beads.  I know you can find some of these at the Robin's Nest because I featured some in the previous blog post.  Check it out!

Now I need to tell you about the clever and handy way that I got these decorations hung up without showing a nail or big shiny plastic hook!  I used a fairly new product called CraZy TACKz.  Yes, I am shameless when it comes to promoting them!  I have many posts on here showing  fun crafty projects with them IN it!  But, first and foremost, they are a great piece of hardware that you can use to hang-up lights, garlands, ornaments, etc.!  They have a hook that will hold up to two lbs. in drywall and soft wood.  

I have a Christmas tree that I decorate every year with boa feather garland.  I call it my floofy tree and I will post a picture of it set up in my dining room at the end of this blog.  It isn't up yet this year, but it looks pretty much the same every season.  I use boa feather garland and it gives the effect of snow!  I love this tree because I can put all the girly ornaments on it in keeping with the romantic country decor that I love!


The photos here are to show the projects, I didn't leave them this way.  The Happy Holidays banner on the mantle wasn't finished here.  I embellished it with small silver ornaments and some ribbons.  Again, hopefully these will inspire some new ideas for your home decorating this Holiday season!


Below is a close-up of a CraZy TACK(z) in action!  They are great for hanging up jewelry and such too!


Ok, last but now least, is a picture of my "floofy" tree!  It is fake, but my other two trees will be fresh off the tree farm.  We don't buy into the commercialism of Christmas very much, but we do love to decorate the house with lots of lights and Christmas cheer!  


From my family to you and yours, I send warm wishes and hope that you experience all the joys that this Season brings!  I say, take time to smell the pine trees and take in the beauty that surrounds us!  Cheers!

This is the first Monday of the month DCC Blog Hop!  Click on the blue button to go forward or backwards to check out the other designers blogs!


Live Life with a Flourish!

Marilyn

CraZy TACKz are presently available on Amazon, at JoAnn's stores, Container Stores and various retailers.


Monday, November 3, 2014

Homemade Thank You Gift


This one is always worth a re-run!  Great for the Holidays!


Happy November!

Every year I like to have home-made gifts to give out to friends for the Holidays.  This recipe for Stove-Top Potpourri is always a favorite and so easy to put together.  Packaging is up to you; I have used cello bags with pretty ribbons, decorated paper mache' boxes and kraft bags.  I like to put the cloves and cinnamon sticks in separate tiny plastic bags so they can be measured out without getting all over everything else.  Hope you enjoy making some!  I include the recipe with the gift, and thus the picture with the recipe on it that is shown here.  Yes, those lemons and spices went into someone's gift bag. You can change the recipe up a little depending on what you have on hand.  This recipe gives us most of the options; a lemon works nicely along with the orange!

Ingredients
  • 2 cinnamon sticks or 1 teaspoon ground cinnamon
  • 1 tablespoon whole cloves or 1/2 teaspoon ground cloves
  • 1 vanilla bean or 1 teaspoon vanilla extract
  • 1 orange peel, quartered (fresh cranberries are also great to add as well)
  • 1 whole nutmeg or 1/2 teaspoon ground nutmeg
  • 2 cups water
Directions
  1. Place water into a small saucepan. Add cinnamon sticks, cloves, vanilla bean, nutmeg and orange peels. Turn heat to medium until water starts to boil. Reduce heat to low and simmer as long as desired. Check water level every 1/2 hour that you have simmering. Water needs to be added as needed. Do not let water evaporate. Use potpourri for 2 days (adding additional water as necessary) then discard and make a new batch.
Makes 2 cups potpourri

This is a perfect Thank-You gift for a hostess!   The little snowman is perfect for hiding away some mulling spices or chocolates!  I cut the box on my Cricut machine and punched out circles for the head and hat.  Easy and cute!

 So, let the Holidays begin!  Click on the blue DCC button to check out great thank-you gifts from more designers.

Happy Holiday Crafting!

Live Life with a Flourish,

Marilyn

Monday, October 6, 2014

Designer Craft Connection Monday!


HAPPY OCTOBER!

This is the month to celebrate pumpkins, falling leaves, the bounty of the local farms and the little trick-or-treaters' who will be parading their costumes for some treats!  This was always an exciting time of year when I was growing up.  There is a crisp cool feel to the air that brings the anticipation of the season.  We are getting some of that now, even though the days are getting up in the 80's.

I have been inspired to get out my paints and create some decorations for the season.  I am showcasing a candy bowl today, all made from lightweight Smoothfoam.  We had a little challenge between a few of us to find a use for a small Smoothfoam doll head.  As you hop through today, you should see several spooky creations!

Click on the blue DCC button to hop forward or go backward.  Enjoy!


\

Happy Halloween!


Enjoy the little blessings along the way &
Live Life with a Flourish!

Marilyn