Sunday, July 27, 2014

My pretty handmade Pocket Journal/Album


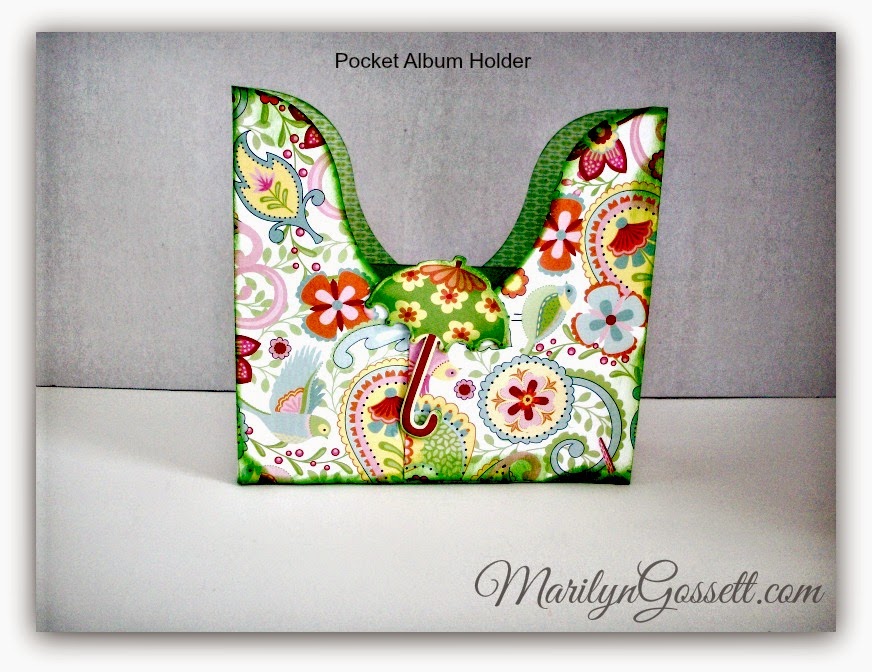
Hello and Happy Day to you!  Pictured today is a Pocket Journal/Album that I came up with yesterday.
I have been purging supplies in my studio and  came across some Anna Griffin papers that I have been holding onto since 2000, 2001.  I love Romantic Country and didn't know exactly what to do with the papers until now.  I can't believe I have kept them until they are almost Vintage!  How time flies when you are havin' fun!  (Or not!)  It just seems to fly anyway!  Lol.  I have also used some other favorites that are out of stock and cannot be purchased any longer.  The Chantilly papers and chipboard Complements I used on this project are from Close To My Heart.  I had extras, but not many left.  I have loved this collection and was sorry to see it go!  I do still have a little "stash" that I will be dipping into from time to time.  And lots of new papers I will be sharing too!

The journal is about 5-1/2" tall x 5" wide.  The front and back covers are cardstock with a pocket envelope glued to the inside.  There are extra notecards in those pockets to make notes on or to save ephemera.  I resisted the temptation to rubber stamp, glue embellishments, etc., because I thought you might like to do that yourself if you happen to be the one to purchase this item in my Etsy Shop! Yes!  It will be up for sale!  https://www.etsy.com/shop/stuffandthingsandco

Each of the pocket pages were cut, folded and glued by me.  Takes a little time to get everything just right.  I made a slide-out card for each pocket with some lines to write on and plenty of room for pictures and ephemera.

I happen to love these journals.  I have made many that are smaller and they are so fun to fill up with little mementos, die-cuts, sparkles, etc.  You can hang them from the binder ring or store them in a box, such as the one I have  made for this journal that is pictured below.

Below is a pictorial of the journal from the front cover to the back.  I didn't picture the very back...but it is similar to the front, not quite as embellished.

If you have any questions, please leave me a note.  


Journal Box made from Chantilly papers and Complements.......(Love...)


If you are interested in purchasing this one-of-a-kind handmade journal/album; visit my Etsy shop...the link is listed above.  (StuffandThings&Company)  I spent most of the day designing and putting this together, so the price may seem a little high.  If it saves you shopping for paper, embellishments and trying to figure out how I made it....it just might be worth checking out!!

Thanks for stopping by!  Enjoy the little blessings along the way!

Live Life with a Flourish,

Marilyn

Friday, July 25, 2014

On any given day......my studio


The REALITY of my daily studio living......this is it!  Some days it looks worse, some days it looks better!  I especially like it when the square table is cleaned off and laid out for my classes.  There are always pretty paper place-mats and some goodies on an otherwise clean table!

I put the pictures into a sequence from wall-to-wall in the space.  When I have it clean, the way I like it; I will take a picture of the entire room.

What prompted me to show off my space today?  Well; we have put together a design team for Deflecto, LLC.  They manufacture office and storage supplies (among other things), and our design team will be using the products in our spaces and thinking of how we can possibly improve our spaces with some new products!

Ok  So imagine you have just walked through the door to my creative lair.  If you look to the left, you will see this shelf. Picture #1.  I have a SECRET!  This is really a door!  Yep!  A door!  If it is closed, it would look just like a matching shelf on the other side of the fireplace in the family room.  My hubby threatens to lock me in...only problem is, I keep the shelves so full most of the time, he wouldn't be able to get it closed! When I was developing product and had lots of things to hang up, I put a cork board on the back of the door...out of site when it is open.  It is great for hanging things that I want out of the way.

Pictured above is the door/shelf...that is open with lots of stuff on it.  The middle picture is the entry way to my storage closet.  There is lots more stuff...stuffed into the rest of it and you don't really need to see that eye sore!  Next to the closet in the corner is my desk.....I am working on getting something new there.  Just don't know what yet.  The pictures below are to the right of my desk, going around the room....#4-#6.
 Below (#7) is my cutting station.  I have a Zing machine to the left.  I really need to learn to use it better.  Either that, or trade my machines in for a new model that does it all!  My fireplace is so cozy in the Winter. I have been going to paint the hearth Black forever....I guess we picked out the wood for it when we built, but it really isn't me to keep it the Oak looking color.  Now for #9!  This table is in a constant state of flux!
I will have to clean it off before I start on something new.  I use the little kitty food boxes to put collections of stuff I am working on in....keeps everything kind of sorted out....Emphasis on "kind of".
 The picture below is as you go out the door.  I have been trying to purge again.....and there are boxes lining the floor going into the family room.  I could say that this usually looks all picked up....but I would be lying.
So, that is it and all for today!  Wait!  I took a picture of my kitty in here this morning.  I think I need to add it to the post because it was all on this day!  It is a beautiful day, I might add!  The end of July in the Summer time.  Lots of possibilities for fun, a week-end just ahead and more craft supplies than a person could use in a lifetime!  What else could a creative mess like myself possibly need???  Oh!  My coffee!  My kitty and my coffee; that is all I need!  (A little Steve Martin humor there.....remember "The Jerk"?  Funny movie!)
Hope you are having a great day!  Take time to enjoy the little blessings along the way!

Live Life with a Flourish,

Marilyn

Sunday, July 13, 2014

Bevy of Burlap Party/Picnic Table Setting


Designer Crafts Connection Designer Group were challenged to design with burlap from BurlapFabric.com.
We are always excited for a new challenge, and if you haven't already noticed, burlap has been around for a while and has proven to be very popular for wedding decorating, home decor and more!  Hope you enjoy the Blog Tour today.  Make sure to enter the Give-Away at the end of this blog.


About a week ago I received a box with a bunch of burlap goodies in it!  There was some red yardage, a little bag with handles, burlap ribbons and a couple of little burlap bags.  My first thought was Christmas, but it is July!  I am reserving some yardage for some Christmas fun, but for now I wanted to celebrate Summer with some easy, colorful and fun table decorations.  I think they are perfect for the picnic table and entertaining on the deck!


I unpacked everything and laid it out.  Had to figure out just what and how I would make using as much of the burlap booty that I could.  I decided to start by showing you how to cut the burlap so that you will get straight lines everytime.  I used this technique for making the flowers you see on the decorations and for the table runner shown in the finished set.  I have pictured the steps below.


I thought that this party needed a little something more, so I found a wooden frame that I got at the craft store and went to work.  To complete these projects, you will need the supplies listed below.

You will need:
Burlap:  red yardage; 3-1/2" woven ribbon with red threads; 1-1/2" natural ribbon with fringed edges; 
burlap bag: 8" high (from top of handles to bottom) x 8" wide x 4" deep (from BurlapFabric.com)
Chalkboard labels by Darice
Natural jute bakers twine
Kraft cardstock
Needle and carpet thread
Round sponge pouncer; paintbrush
Americana acrylic paints by Deco Art:  Sand, Foliage Green
Black beads, 1/4"
Recycled soup cans (thoroughly cleaned and dried)
1/4" round paper punch
Glue gun, glue sticks
Scissors, paper cutter


First you will remove the cardboard from the middle of the frame.  Reserve this piece for a little later.  You will cut a piece of Kraft cardstock to fit and adhere to the cardboard heart.  Below are the steps to cover the frame.  Cover the front of the frame with a piece of burlap about 1-1/2" larger than the frame.  Turn the frame over, wrap up and adhere the corners.  Repeat with the edges.  Cut the center out of the burlap heart leaving a 1" border.  Snip into the curves of the seam, wrap up and adhere to the sides of the heart.  When finished, cut a piece of burlap to fit the back of the frame and adhere.  You can use the middle space to write the name of the happy couple, or use it for a menu.


Up-cycled cans:  Refer to the photo below to see the set.  I recycled some soup cans by washing them thoroughly and making sure there were no sharp edges.  Cut a piece of burlap to fit around the can and adhere.  Pull burlap threads to make a small fringe around the top edge.  Apply paint dots using the sponge pounce r.  Use finished cans for plastic silverware, napkins, straws, etc.
Flowers:  I thought the gathered burlap would make a great poppy-like flower.  Using a heavy thread and a needle, I sewed a running stitch along one long edge of a 1-1/4" x 10" strip.  I pulled the thread to gather it into a circle and whip-stitched the edges together to secure.  There is a small round hole in the center of the flower.  Roll a 2" piece of natural burlap ribbon (with fringed edges) and poke one end into the hole. Adhere. Glue a black bead into the fringe as shown.
Finish:  Refer to the photo given and adhere burlap ribbon to adjacent corners of the frame. 
Chalkboard labels:  Adhere label to a larger piece of Kraft cardstock.  Cut out around the label, leaving a 1/8" border.  Punch a hole in each side of the label.  Thread one end of the twine through one hole and pull the tails up even.  Repeat for the opposite side.  Tie the twine tails together on the back of the frame.  Repeat for each of the chalkboard labels; cut a smaller length of twine for the cans.


Add a little extra pizzazz to the containers!  Paint the clothespins; let dry.  Adhere a burlap flower to the
top of the clothespin. I made burlap poppies and roses. Clip the decorated clothespin to the edge of the can container or use it as a decorative chip clip or gift bag embellishment.  I think a set of these decorated clothespins would make a nice gift!


Table Runner:  Follow the instructions given above to get a straight edge on the burlap.  After cutting the width and length that you need for the size of your table; pull the burlap threads on the sides and ends to make a fringe all the way around.  For this runner, I unrolled a matching length of 3-1/2" woven burlap ribbon to match the length of the table runner. Cut a V in each end of the woven ribbon.


Participating DCC blogs:

Michelle FraeCummings  faeriedustdreams-michelle.blogspot.com/
Sue Eldred   sueeldred.com
Susan Brown  sbartist.com
Terry Ricioli   terryriciolidesigns.blogspot.com
Angela Holt   angelaholtdesigns.com 
Anita Scroggins   theflamingochronicals.blogspot.com
Beth Watson   bwdesignstudio.blogspot.com
Carmen Flores Tanis  florestanisstudio.com 
Cherish Flieder  somethingtocherish.com
Cindi Bisson   fatcatcreations.blogspot.com
Jennifer Priest  hydrangeahippo.com
Julie McGuffee   juliemcguffee.blogspot.com
Kristi Parker   kristiscreativecafe.blogspot.com
Lisa Fulmer   lisalizalou.com
Madeline Arendt   madelinesthoughts.blogspot.com
Marilyn Gossett   marilyngossett.blogspot.com

Check out the following website url for more awesome products!
For more information on Burlap products available and social media sites to follow, check out the following links:

BUT THERE'S MORE!  Would you like an opportunity to win a $100 selection of burlap products
 that includes a nice variety of natural and colored burlap yardage, ribbons, embellishments and totes?  Go to the following link and enter!


Whether you like Diet Coke or not, you must admit the marketing campaign they have on their cans right now is pretty cool!  I think you are a Star and wish you a wonderful day and lots of crafty fun from the inspiration you get on the Blog Tour today!  Be sure to enter to win the $100. worth of burlap products give-away!  Please leave me a note if you have any questions about the projects featured here today!

Live Life with a Flourish,

Marilyn

Sunday, July 6, 2014

Designer Craft Connection - July


Hello friends!  It is the first Monday in the month of July and time for a Designer Craft Connection blog post!  If you haven't been on the blog tour before, just look for the blue DCC button and you can go forward or backward to visit other designer's blogs.  

This month we are featuring Party Decorations.  I got to looking through some of my design files and came up with a few that I thought were fun!  I designed these and some others not shown here in 2005. I kept them fairly generic with all ages in mind.  They are "kid friendly" as well.  For a party with boys, I would use the crabs, starfish and a pirate theme.

Wood pieces have always been like puzzles to me.  I love coming up with designs using basic wood shapes, glue and acrylic paint.  The picture below features Mermaids and Starfish.  The wooden treasure box was painted with an undersea theme and I painted the circles to look like pearls. 


The mermaid on the left has a clothespin glued to the back.  She is adorning a paper bag and keeping the contents a secret for now.

The jars are filled with handmade Bath Salts and embellished with jute cording.  The starfish are glued to the jute.  I plan on putting some glitter on my mermaids.  I didn't do it here for the sake of photography.  I thought it would photograph better without shiny glitter.


The wooden frame here is easily found at most craft stores.  I think I bought this one, as well as the other wooden containers at Michael's Crafts.  They were about $1.00 a piece!  The birthday girl or boy should get the place of honor in the frame.

This is it for today.  I hope you got some inspiration here!  If you have any questions or comments, please leave me a message in the comment box.  Enjoy the rest of the blog tour!  Thanks for stopping by!


Live Life with a Flourish,

Marilyn

I have a PS. for you today!  We will be doing another Designer Craft Connection Blog Tour starting Sunday, July 13th and it will run for about a week.  We will be featuring designs made with Burlap!  I am excited to see what everyone comes up with.  It should be lots of fun!  We will keep you posted!  M.


Burlap signage from an earlier post........

Monday, June 2, 2014

Designer Crafts Connection Monday - Handmade Gifts


Happy Monday and welcome to the Designer Craft Connection Blog Hop!  If you haven't been on the hop before, just click on the blue DCC button to go ahead or back.  Handmade gifts are the featured theme today!

I have accumulated a lot of craft supplies over the years.  A particular favorite of mine is paint.  Well, paint and wood!  I work in different mediums, but like to get back to painting whenever I can.

As a sideline and for fun, I have a small booth in a vintage store in my town.  I call my space "the Cube" as I have a small area, front and back that is in the middle of the floor.  I have been able to use up a lot of supplies creating gift and home decor items.  I am attaching some photos from my space.  There are a plethora handmade items that can be given as gifts.  Thanks for coming by!


The sign above my booth is actually a clock!  It was made to put pictures around the perimeter of the circle.  I had it on a shelf for several years, thinking that someday I would have a use for it.  I removed all of the glass and painted each square so that I could put letters on the clock.  I cut vinyl letters with the Cricut machine and adhered them to the square spaces.  The clock even works!  I think it made a fun sign!

Have a great Monday!  Hope you enjoy the hop!

Live Life with a Flourish,

Marilyn

Thursday, May 29, 2014

Steampunk Perpetual Calendar


You will need:

Smoothfoam: one 12" Scrapbook Mount
12" Scrapbook Tablet: Tim Holz, "Destination" paper stash
12" cardstock:  one Slate, one Dark Brown
Decou-Page medium: Matt by Deco Art
Metallic Waxes:  Black and Copper by Deco Art; rag scraps for application
Craft Glue
Pigment Ink Pad, Black
Embellishments: 1-1/4" filigree butterflies, 1-1/2" filigree squares, 1" metal washers, brass paper fasteners,
                          1" h x 3" w doll eyeglasses, paper roses: 3/4", 1-1/4"
Tissue Paper:  matte gold, metallic gold
19 gauge wire, two pieces bent into 1/2" u -pins
2 tacks with a hook: used patented clear and round CraZy TACKz  (see link in credits below)
Artiste Cricut Cartridge by Close To My Heart (die-cut gears)  (see link in credits below)
PDF's:  (attached) Calendar Elements, Pattern for Wings, Gears

Tools: 
Cricut Die-cut machine
Paper Trimmers
Scissors
Paintbrush
Wire Cutters


1.  Wad the tissue into a ball.  Unfold and flatten out.  Apply Decoupage medium to the Smoothfoam,                 following manufacturer's instructions.  Tear tissue into large pieces; adhere to the entire surface.  Tear             large strips of the metallic gold tissue.  Adhere, leaving wrinkles in the tissue paper.  Allow to dry                   thoroughly, preferably overnight.

2.  Apply copper wax randomly to the textured surface, allowing the gold to show through in spots.  Repeat      with the black shimmer wax.  Apply the Shimmer Wax to the paper wings and to the filigree elements.


3.  Cut ephemera clocks from the Tim Holz papers.  The cardstock gears were die-cut.  A PDF file is                attached if these must be cut out by hand.  The larger gears are important for the over-all design.  The 1-      1/2" die-cut gears could probably be replaced by something purchased that will work the same.  There          are 22+ of the smaller gears that are adhered to the perpetual calendar pages.

4.  Chalk the edges of the ephemera and die-cuts with the Black pigment ink pad.

5.  Arrange and adhere ephemera to the textured Smoothfoam.

For the Calendar:

1.  Background:  Cut one 6-1/2" square and one 6" square from patterned cardstock.  Adhere the smaller          square to the larger square.  Center and adhere to the board.

2.  Months:  Cut twelve 1" x 2" rectangles.  Print out the attached PDF containing the months and dates.            Center and adhere "January" to the background paper.  Repeat with February and adhere to the                    backside of the January card.  Repeat for each month.

3.  Days:  Cut 22 2-1/2" x 3" rectangles.  Cut and adhere the days as for the Months, using the front and the      back of each card.

4.  To hang the cards:  Center and glue the bottom half of a 1-1/2" gear to the front of the January card.              Repeat; gluing one gear to the front of each card.

 To finish:
*  Cut the fasteners off of the brass paper fasteners and glue the round piece to the corners of the                     calendar as shown.  Repeat the process with two more brads only adhere one to the center of the 2 large     gears.
*  Center and glue the CraZy TACKz to the calendar.  Hang the perpetual calendar cards on the hooks.
*  Center the eyeglasses above the calendar cards.  Make 2 pilot holes for the wire u-pins.  Secure the             eyeglasses to the board.
*  Display on an easel or glue a saw-tooth hanger to the back.


You can add a couple more panels to the calendar for a larger piece of wall decor.  These last two photographs show an example of some Steampunk paper sculptured angels I made last year.  I make them in ornament size (6") as well as the taller ones as shown here.  Hope you have enjoyed the project!

Visit the Smoothfoam Blog (link) for lots more ideas using Smoothfoam products.

Live Life with a Flourish!

Marilyn

PDF Patterns for gears and wings (link)

Product Credits:
*Smoothfoam, 12" Scrapbook Wall Mount
*CraZy TACKz, the patented Tack with a Hook  (link)
*Deco Art: Matte Decou-Page
*DecoArt:  Metallic Lustre:  Black Shimmer, Copper Kettle, Iced Expresso
*Close To My Heart; Cricut "Artiste" Cartridge #Z1790  (link)


Monday, May 12, 2014

Smoothfoam Swivel Block Collage


Smoothfoam is the base for this fun piece of home decor.  It is visually pleasing and boasts some inspiring sentiments. Want to display some photos?  Attach them to the sides or back.  Each block will swivel to reveal a different side.  There are so many fun papers with matching embellishments in the marketplace!  I want to show off the collection in one place and not piece it out.  This is how I did it!


Top three cubes swivel.....


Change up the cube collage by turning the top three cubes.  They swivel by connecting with a skewer or toothpick.


You will need:

Smoothfoam: three 2" x 4" x 4" blocks
Smoothfoam:  one 2" x 4" x 12" block
Coordinated scrapbooking papers, 12" (I used Close To My Heart Ariana papers, to order: X7179B
Coordinated embellishments (I used Close To My Heart Ariana Complements), to order: X7179C
pencil for tracing
Rhinestones, Clear Flourishes - Small, to order: Z1812
Craft Glue or Mod Podge, brush or sponge
Paper trimmer, scissors
3-D adhesive dots
Craft glue
CraZy Tackz - (tack with a hook)
Toothpicks or wooden skewers

1.  Base:  Cut two 4" x 12" rectangles from the scrapbook papers.  Glue to the front and back of the large Smoothfoam block. Cut and glue two 2" x 12" rectangles of contrasting paper to the top and bottom of the block.  Cut and adhere a 2" x 4" rectangle to each side. (For a perfect fit, trace around each block before cutting.)

2.  For each block:  Cut two 4" squares for the front and back.; four 2" x 4" pieces from coordinating papers and adhere.

3.  Smooth out any air bubbles and allow to dry thoroughly.  Trim off any excess paper from the edges and then distress the edges by sponging with ink.

4.  Arrange and adhere the matching die-cuts to each block.  Use 3-D adhesives to add dimension.

5.  To make the blocks swivel, refer to the diagram given and connect the blocks with skewers or toothpicks.  Do not glue.

6.  Glue the TackZ into each side that you would like to hang ephemera, keys, etc.  I like to apply glitter to the stopper of the tackz for added effects.

Hope you are enjoying some beautiful Spring weather!

Until next time,
Live Life with a Flourish!

Marilyn


Hook it up with CraZy TACKz!
www.crazytackz.com