Tuesday, February 18, 2014

Shabby Chic Bookmark Wedding Favors


Planning a Wedding or Shower?  Here is an idea for favors that the guests will enjoy!  Sticky Sticks are perfect for this project.  The adhesion is strong enough to hold the decoration without worries about it popping off.  Works great for pieces of chocolate too!  This is an idea that can be adapted for a Baby Shower, Birthday Party, Holiday Party, etc.  There is a saying I love!  "Whatever the mind can conceive and perceive it can achieve!"  I would love to hear about your ideas too!


You will need:

*Sticky Sticks:  At least one package
 (depending on how many favors you will need)
*One 8" Smoothfoam hollow dome
*DecoArt paints:  Americana Decor:  Chalky Finish: Lace, New Life, Crackle Medium
*Package of 2-1/2" kraft scalloped chipboard tags with ribbon embellishment
*1-1/4" Paper Flowers: one for each stick, cut with Cricut Machine or purchased
*2" Flower cut-out (for contrast) one for each paper flower
*Rubber Stamp with saying
*Ink Pad, Clear stamp Block
*Cardstock:  Colonial White (for 1" scalloped edge), two sided floral pattern
*Chalkboard labels (1)
*Glue
*White Fine-point Permanent Marker
*Paper Punch for corners
*Paint Brushes, Disposable Plastic container, paper plates, paper towels
*Cricut Expression Machine (optional)

Instructions:

1.  Invert the dome and poke slots in it using a Sticky Stick - poke one in the top middle, then make even rows for the number of favors you will have.  Paint the outside of the dome Green; let dry.  Apply the Crackle Medium following the manufacturer's directions.  Apply a top coat of the Lace chalk paint.

2.  Paint each of the Sticky Stick's with the Chalk paint, front and back.  Let dry.

3.  Dry brush Lace chalk paint to each Chipboard Tag to give it a "vintage" look.

4.  Glue a flower to one contrasting background flower.  Adhere to a chipboard tag.  Remove the adhesive strip from one Sticky Sticks, adhere the tag.  Repeat for each.

5. Stamp the message/saying on the stick (with the flower end to the left.)

6.  For the sign:  Adhere one Sticky Sticks to the flat edge of a second Sticky Sticks to make it about 10" long.  Cut and Layer the papers for the "sign".  Adhere the chalkboard label to the front of the sign and write the couples' name on the label with the white marker. Round the corners of the sign using the corner punch.


 Here are some closer views to help with the details.


Above is a side view......

Below is a view from "above".


If you have any questions or comments about this project I would love to hear from you!

Hope you are inspired now to "go forth and craft!"


Warm regards,


Marilyn


Product Credits:
Sticky Sticks:  Self-Adhesive Jumbo Craft Sticks
Smoothfoam:  Half Ball spheres
DecoArt:  Chalk Paints
Darice:  Tags and Labels


Close To My Heart: Papers, Rubber Stamps, Inkpad, "Artiste" Cricut Cartridge

Monday, February 3, 2014

Celebrate the Month of Love!

Let's have a Valentine's Party!

Too early to think about Valentine's Day?  Never!  We have two whole weeks before we will be celebrating this day of love.  I like to decorate my house for the holiday theme when appropriate and be ready for friends popping in, a spontaneous party, or just for my family to enjoy! 

A pictorial tutorial is always welcome for us creative types.  Being a "visual" type myself, I find this useful when putting together any project.


Here is what you will need:

*Sticky Sticks, flat wooden 1-1/2" circle (I used a Woodsie circle)
*8" Smoothfoam disk (1" deep")
*Memory Cardstock papers:  green, dark pink, white, red, light pink, yellow; patterned paper with a coordinating print on the back side.
*pencil, piece of paper
*white glue or other adhesive
*jute twine
*paper cutter, score, scallop paper punch, crafting scissors
*Acrylic Paint, lt. peach, black, white, red
*Paint brush, water bucket, paper towels, paper plate, toothpicks
*Optional: Cricut cutting machine for hearts and pennant and cartridge with matching shapes

*Note:  The hearts and pennant  can also be cut out with a handmade pattern.  Remember how we made paper hearts as a kid?  Fold plain paper in two, cut half of a heart on the fold then unfold and trace around it onto red construction paper?  This still works and can look really cute! The same for the triangle shaped pennants!

Ready to start?  Here is what you do!

GATHER YOUR STICKY STICKS.  LAY THEM OUT AS SHOWN IN THE DIAGRAMS GIVEN.


 Shoulders: Cut one Sticky Stick from the adhesive end in, 2-1/4".  Hips: Cut a second length at about 2-1/2".

Lay the pieces out with the adhesive side up as shown. They will help you know where they will be placed as shown in the next photo.


In the photo below, I laid the pieces out .  You will remove the release paper and turn each piece over before adhering everything together.


You will need a little glue to attach the bottom of the middle stick to the "hips" piece you cut earlier.
Then, remove the release paper and adhere each "leg" Sticky Stick to the hips piece as shown in the photo below.


Now you are ready to trace around the body on the plain piece of paper and create a clothing pattern for your girl!  Lay her on the paper, trace around the body, making the pattern larger around the middle. Allow just a little extra room around the edges. Refer to the finished project for some help here.  Once you have front and back for the shirt and the pants, lay the pieces aside.

Paint the head, neck and hands, lt. peach.  Paint the bottom of the legs black.  Paint on the front and the back.  Apply a black dip dot with a tooth pick of stylus for each eye.  Dot the mouth with red.  When paint is dry, apply some powder blush to each check using your finger.


Hair:  Cut two 2-1/2" circles from the yellow card stock.  Refer to the finished project and cut a triangle out of one circle.  Place over the face to make sure the opening is large enough for the face to show.  Take the triangular piece and cut a fringe.  This will be the "bangs".  Place and adhere the bangs to the top of the head, place and glue the yellow hair to the head.  Adhere the "whole" yellow circle to the back of the head. 
 *Note:  You can change the hair color to brown, black or auburn.  Whatever your prefer!


This is a picture of the pattern I cut out for the outfit I dressed her in.  There are two pieces.  The shirt and the pants.  I traced around the pattern onto the memory paper for the shirt; reversed the paper and cut out the coordinating pants.  Reverse the pattern and cut out matching pieces for the back of the outfit.


I didn't have the painting done when I photographed the step shown above.  Make sure the painting is done, then adhere the outfit to the doll, front and back.  I chalked the edges using a grey ink pad and wedge sponge.  This is optional.


Cut a piece of jute twine and tie one end to each wrist.  Leave it a little bit slack in the middle.


I cut the pennants using my Cricut machine and cartridge.  You can also make them by using your own pattern.  Fold your dark pink cardstock in two, place the flat side of the pattern on the fold.  Trace around the triangle pattern, and cut out the pennants.  Fold over the jute twine as shown and adhere.  Layer and adhere the punched hearts to each pennant as shown.


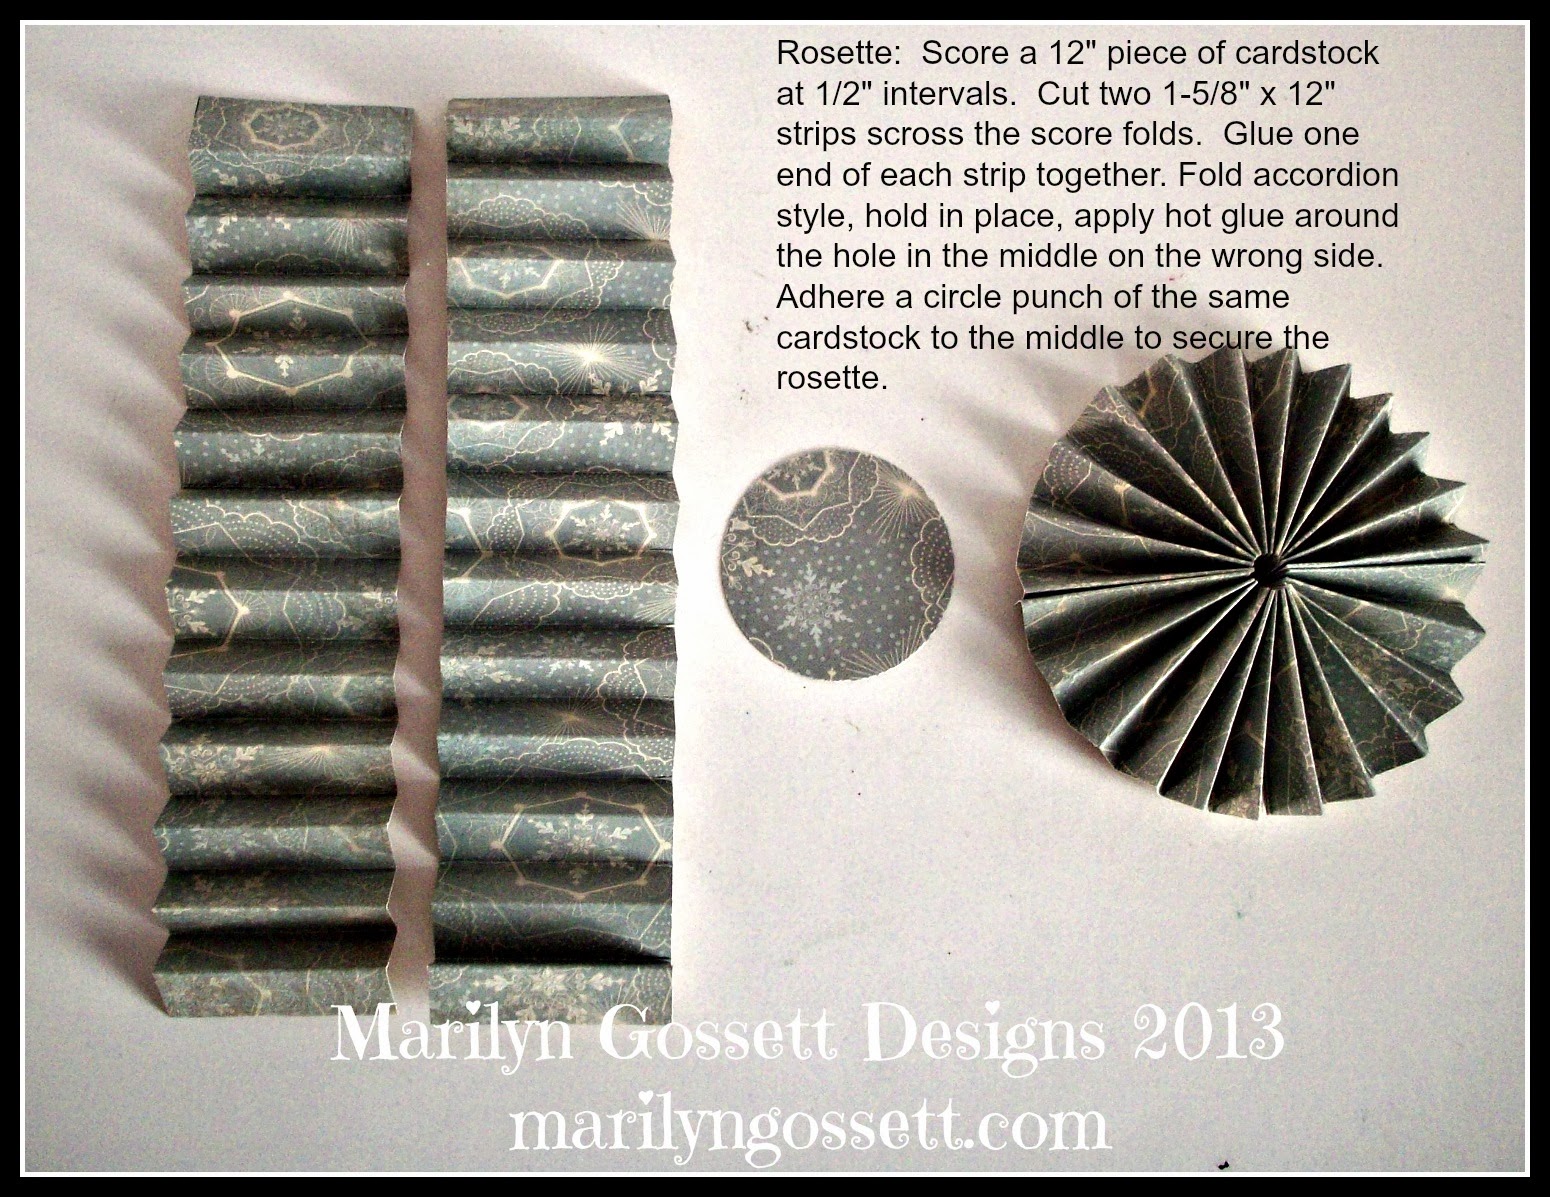
I adhered two sticks together to make a longer stem for the paper rosettes.  Do this for two of the stems and stagger the lengths as shown. Below is a pictorial tutorial for paper rosettes.  Adapt the width to the size you want to make your rosette.


You have options here!  You can make bigger hearts and adhere a front and back to each Sticky Sticks stem.  I made rosettes and adhered three different sizes of hearts to each.  The "stems" are covered with 1" strips of green cardstock.  I glued a 1" strip of green paper around the edges of the Smoothfoam base.  The finished project has scalloped circle paper punches adhered all around the top of the Smoothfoam.  You can also use glitter, moss, or just a flat piece of paper cut to fit the top of the Smoothfoam disk.


I hope this project gives you a great start to your Valentine's planning and decorating!  If you have any questions, please leave  a message.  May the New Year be off to a great start and many blessings lie ahead!

Live Life with a Flourish,

Marilyn

Monday, January 27, 2014

New Year happenings!


American Country Mercantile is a little gem hidden away in Keizer, Oregon!  The store is filled with vendors with a passion for all things Prim, Country, and Romantic Country.  The latter would be me, however; I am focusing on paper designs and crafts in my booth for now.  I sell cards, favors, gifts and home decor, all made out of paper and maybe a little wood!  Each design is original and handmade in my smoke-free studio. If you live within driving distance, it is well worth a trip if you enjoy this kind of store!

Below is a picture of my booth.  The fans coming down from the ceiling are mine...the shelf on the wall behind it belong to my friend, Cindy Goff.  I will show you a pic or two of some of her booth too.


So, that was a little preview of what I have been creating for Valentine's Day.  There are some "everyday" items in the booth too, but I like to focus on a theme for each month.


If you live out of the area and like the Valentine's items, I also have an Etsy Shop and take special requests for items on there if you do not find just what you are looking for.  Here is the link: https://www.etsy.com/shop/stuffandthingsandco


Cindy's home-y little spot!


The above two photos are a little peek into Cindy's area that is right behind me.  Lots of handmade goodies along with the vintage items; there is something for everybody!

So, this is a "snapshot" of one of the things I have been doing to start off the New Year.  Hope you are enjoying 2014 and get plenty of time to shop and craft!  :-)

Here's to 2014!  May it be filled with lots of good things, and may we have the sensitivity to enjoy the small blessings that are often overlooked!

Happy Crafting,

Marilyn
http://www.marilyngossett.com/

Tuesday, December 24, 2013

MAY YOUR CHRISTMAS BE BRIGHT! HAPPY HOLIDAYS!


We went on our annual Adventure and Christmas Tree hunt in Silver Falls, Oregon, 2013.

Here is a pictorial of our trip to the tree farm, picking out our trees with our friends and our canine God Child, Sophie.  The progression is from farm to home, decorations put on, and furry feline family members trying to get as close as possible!

 Hope you all enjoy Peace, Love and Joy this Holiday Season.  May 2014 be filled with new and wonderful beginnings!


Blessings All!

Marilyn
www.marilyngossett.com

Sunday, December 8, 2013

SNOWMEN and CHRISTMAS TREES


 'Tis the Season!  Here is a DIY Jolly Snowman Vignette that can stay up through January!  Would you like the instructions?  Check out the December Blog Post on the Smoothfoam Blog at http://www.smoothfoam.com/blog/frosty-friends-winter-decor/ .  You will find the instructions there along with some other fun projects by professional designers in the craft industry.

The Starburst Snowflake Wall decor that is pictured behind the snowmen is posted here on an earlier blog.  If you scroll down you will find it in the November posts.  There are instructions there.


 Scroll down for some more photos......


Our weather has a lot of us thinking about snowmen!  Here in Oregon we have been having record setting low temperatures!  The sun has been coming out during the day, but the thermometer has been staying at about 20 degrees and lower.  Brrrrrrrrrrrrrrr!  We got our Christmas trees yesterday.  I will post a picture at the end of this blog post.  Hope you are enjoying the season!  I am trying to find the little blessings each day and celebrate them all!


I will post pictures once I get the trees decorated!

Cheers!

Marilyn

Thursday, November 14, 2013

Designer Challenge featuring the The Robin's Nest and Smoothfoam


"May Your Holidays Be Bright" home decor

Tis the Season!  It is almost time to get out the decorations and start the countdown to Christmas!


I am a big believer in enjoying every day and celebrating each one as a gift!  I am starting to feel the anticipation of family and friends spending time together, delicious meals and treats, and beautiful lights and decorations all over the house!  Part of my enjoyment comes from making decorations for the house and for gifts.

The Robin's Nest sent me some lovely cuts of Christmas cardstock and a package of their colorful flat beads for this Designer Challenge.  The beads are perfect for embellishing many things from the ornaments we create, to home decor, or paper crafting. The decorative piece I created can be hung on a wall or set on an easel.  I prefer the easel, somewhere that the light can shine on the glitter.  It lights up!

Supplies you will need:

The Robin's Nest:  two 5-3/4" squares of winter cardstock; assortment of colored beads
Smoothfoamtm:  One 12" square scrapbooking mount board
Glitter cardstock:  one 12" sheet silver (Cut two 6" squares)
Red cardstock:  one 12" sheet (for cutting letters)
Die-cut machine  *optional
Die-cut cartridge with alphabet *optional
Snow Tex, craft stick
Adhesives:  (I recommend 3 in 1 glue and a Dimensional medium for adhering beads)
paper cutter


Instructions:

1.  Apply Snow Tex to the Smoothfoam wall mount using the craft stick.  Spread it as thin as possible,
     allow to dry.

2.  Cut out the letters with the die-cut machine.  The larger letters are 2-1/2" high.  The smallest are 1" high.
     (Another option is to purchase die-cut letters)


3.  Glue the beads to the winter scene on the cardstock as shown in the photo given; allow to dry.


4. Adhere the embellished cardstock squares to the right side of each silver cardstock square.


5.  Arrange all of the elements on the wall mount as shown in the photo given and adhere to secure.

*Oops!  Almost forgot to show you some frame options!  I used a wooden frame with a 12" square indent.  Perfect fit for the Smoothfoam scrapbook mount.  I painted the frame and added 1" letters that I cut.  Purchasing letters are good too!  A second option is to paint your frame and leave it plain!  Take a peek!


*********************************************************************************
Bonus Project

I also created a mini journal with some of the other pretty Christmas papers from the Robin's Nest.  The pages are little pockets and I punched a couple of holes on each page for the binder rings.  The little pockets are for mementos, messages, gift cards, etc.  You can use pretty die-cuts, photos, dimensional punches (such as the mini envelopes), and beads from the Robin's Nest!  I applied minimal embellishment to this mini journal....I am sure you will have lots of your own ideas!  


If you have any questions please message me.  Thank you for stopping by!  
Wishing you lots of inspiration and a blessed Holiday season!

Happy Crafting!
Live Life with a Flourish,

Marilyn


                         http://chatteringrobins.blogspot.com/2013/11/ornament-blog-hop.html

The above link will take you to the main page!  Click on each thumbnail to view the other Designer Blogs!