What is more comfy than fleece and a soft pillow? I can't really think of anything! Using a Fairfield pillow made this an easy sewing project that can be completed in an afternoon.
You will need:
* Fairfield Pillow: Soft Touch Pillow 12" x 22"
* Fleece: one yard
* Felt sheets: Turquoise, dark pink, cream, brown, yellow
* Ric-Rac: Yellow; standard size
* Buttons: 2 white; 2 turquoise
* Sewing machine
* Scissors
* Straight pins
* Needle & thread
* Steam iron
* Fabri-Tac Adhesive (optional)
Directions:
1. Lay the pillow on the wrong side of the fleece. Cut the fleece to loosely fit around the pillow and enough for a 5/8" seam allowance. Leave 6" excess at the bottom of the pillow and enough for a seam allowance at the top. The fleece casing should be a little loose on the pillow.
2. Sew a slight curve in the top seam as shown in the photo given.
3. Cut notches into the seam allowance to allow for stretching.
4. Wings: Copy, paste and print out the pattern given.
Click here:
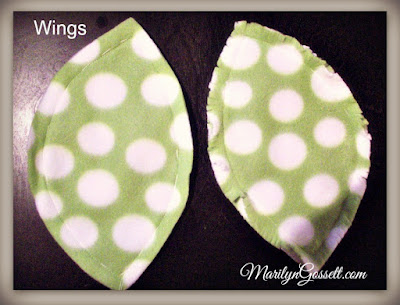
http://marilyngossett.blogspot.com/2015/06/wing-pattern.html Double the fleece with right sides facing out and cut out from the pattern given. Use the needle and thread to sew a basting stitch 1/4" in from the outside edges. Stitch over the basting stitches with the sewing machine. Cut a fringe into the seam allowance taking care not to cut through the stitching.
5. Eyes: Cut out the layers from the felt as shown in the photos given. Cut the notches into the pink and cream circles as shown.
6. Beak: Cut a beak on the fold of the yellow felt. It does not have to be an exact size. Use the photo given as a guide. Sew a running stitch below the top fold of the beak. Layer the circles for the eyes; use the needle and thread to stitch them together. Anchor them by sewing a button to the center of each eye.
7. Stitch a button to the top of each wing.
8. Pocket: Use a scrap of fleece for this step. Measure for the size of pocket you would like to attach to the front of the pillow. Fold sides under 1" all the way around the pocket and press with steam iron. Sew a running stitch around the outside edges of the entire pocket. Stitch the ric-rac to the top edge and to the bottom edge of the pocket.
9. Heart Pocket: Make a heart from paper like you did when you were a kid. (Cut on the fold, then unfold.) *Should be about 6-1/2" across at the fullest part of the heart. Cut the cream felt heart slightly smaller. Cut a 5" heart from the pink felt. Center the pink felt on the cream heart. Sew around the edges of the pink heart. Cut notches in the cream felt heart as shown. Stitch or adhere to the larger turquoise heart.
10. Follow the manufacturer's directions to adhere the embroidered letters to the heart pocket.
11. Assemble: Place the pillow in the pillow cover, the seam up the center of the back. Sew the pillow cover closed along the bottom edge of the pillow. *Another option is to velcro the bottom closed for easy removal, though I did not do that here. There should be excess fabric. Cut into the excess fabric below the stitching, making a fringe as shown.
12. To finish; I used Fabri-Tac to adhere the eyes, beak, wings and pocket to the pillow casing. If you are a "purist", you may prefer to stitch everything in place. Either option will get er' done.
This is a snuggly pillow for kids and adults alike! I suggest taking it on long car rides or as a companion at naptime. Coloring books and stickers easily fit in the pocket. If you leave the heart open on the top and the middle, it can be used as a pocket as well.
Enjoy the rest of the blog hop and see what the other designers have done with these high quality pillows and products from Fairfield. Just go to the blue Designer Craft Connection button on the sidebar and click to go forward or backward on the hop.
Take time to enjoy the small blessings along the way
and
Live Life with a Flourish!
Marilyn


