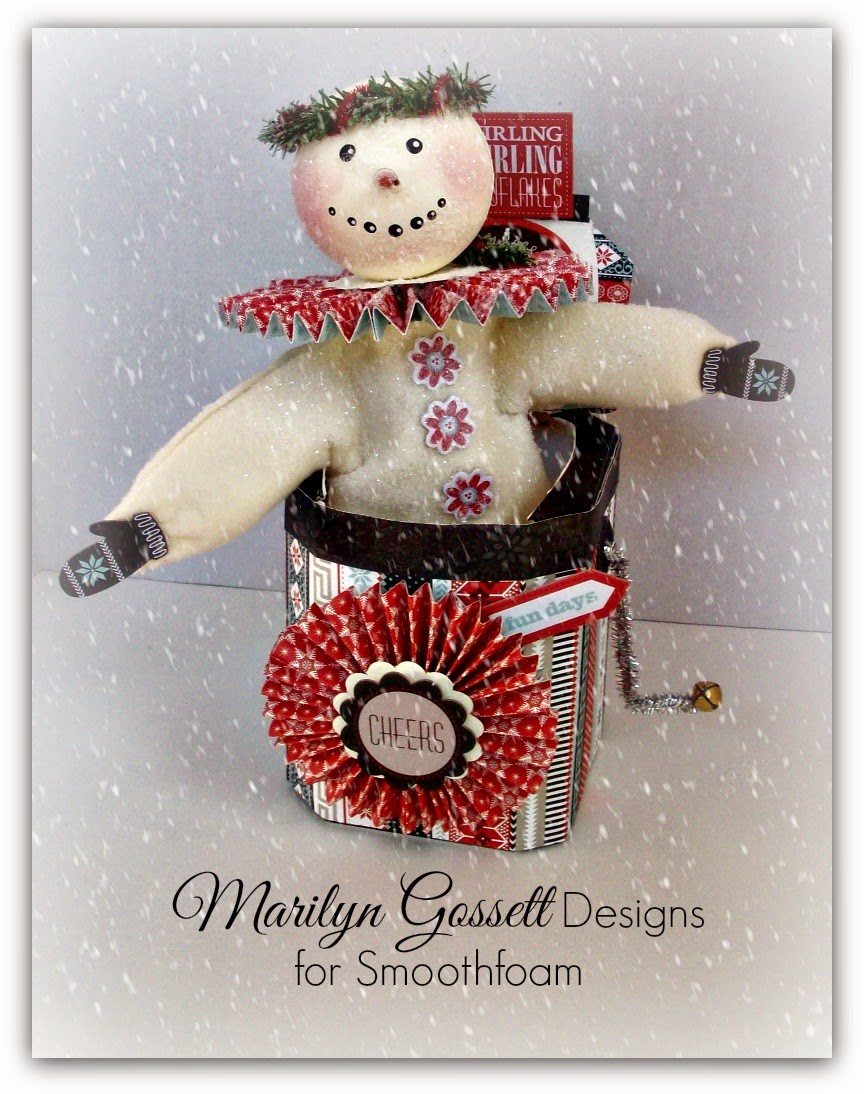
Do you like to recycle? I have a hard time throwing things in the trash sometimes. Even into the recycle bin! For example; the little K-cups after they are used. I know there has got to be a really cool craft project lurking there, but don't take the time to figure one out. The box was another story. I used the 2.0 carafe k-cup box to complete this project. It could be another box with a flap; but this one was deep enough and worked nicely. Following is the supply list for this project. Hope you enjoy it!
Supplies:
Smoothfoam: 3" ball
Cardstock papers: Snowhaven papers and Complements by Close To My Heart To order: www.marilyngossettdesigns.ctmh.com/retail
Acrylic paints: Americana Decor Chalky Finish: Whisper; Americana Acrylics: Lamp (Ebony) Black, Spiced Pumpkin, Warm White by DecoArt
Americana Decou-Page for paper by DecoArt
Felt: Vintage White; 2 sheets
Paper Punch: 1-1/2" Scallop
Chenille Stems: one silver metallic, one red metallic, one pine
Jingle Bell: one 1/2"
Fiber Fill
Diamond Glitter
Wire cutters (for cutting chenille stems)
Powder Blush
Scissors
Paintbrushes
Stylus
Wood Chop Stick with pointed end
Glue gun
other adhesives
*Pattern for the Body/Snow Suit
Instructions:
1. Box: Measure the height of the box. Cut out 12" paper to fit the box and lid. Adhere papers to the box & lid using the Decou-Page.
2. Snowman (Jack-in-the-Box): Using the wooden skewer for a handle, poke the pointed end into the Smoothfoam ball. Paint entire ball with Whisper Chalky Paint. Let dry.
Face: Apply black dip dots for the eyes and mouth. Blush the cheeks with powder blush. Rub in with your finger. Highlight the eyes and mouth with tiny White dip dots. Allow to dry.
3. Nose: Remove the skewer. Paint the pointed end orange. Cut 2" from the pointed end. Insert and glue into the face as shown. Replace the remaining skewer into the pilot hole in the head. This will secure the head in the body portion of the snowman.
4. Body/Snow Suit: Fold one rectangle of felt in two along the long edge. Use the pattern given and cut out one. Repeat with the remaining sheet of felt. Glue all the edges together; leaving an opening for the head. Turn the suit right side out, hiding the seams. Lightly stuff from the bottom with fiber-fill. Lightly stuff the sleeves with the arms extended.
5. For a rosette: Cut three 2" x 12" pieces of paper. Accordion fold every half inch for each piece. It works best to score them before folding. Adhere the edges, making into one piece. Gather the folded papers into a circle, securing by holding it down, in place. Adhere a scalloped paper circle to cover the hole in the middle to secure the rosette. Repeat on the opposite side. Make one rosette for the front of the box and one for the snowman's collar. The glue gun works best for this step.
6. Assemble: Make a pilot hole in one rosette (collar). Poke skewer through the rosette and neck opening into the body suit. Apply glitter to the head, rosette collar and snow suit. Shake off excess. Place in the box with the arms extended as shown in the photo given. Crank Handle: Bend the silver metallic stem in two. Shape into a handle and glue the jingle bell onto the bent end. Make a pilot hole in the middle of a 1" circle. Push the ends of the stem 1/2" to the back side of the circle and bend out like a brad. Adhere to the side of the box.
7. Finish: Halo: Loosely twist the red metallic stem around the pine stem. Make a circle to fit around the head and twist the pine ends together to secure. Adhere to the head. Glue a piece of pine stem to the collar for added decoration. Use the Close To My Heart Snowhaven Complements www.marilyngossettdesigns.ctmh.com/retail to embellish the snowman with mittens, buttons on front, and signs. *Designer tip: Use Cricut machine or paper punches to cut embellishments if you don't have access to the die-cut Complements. Rubber stamps will work for the sayings. Glue the second rosette to the front of the box and embellish with die-cut sayings.
Now enjoy an adorable Christmas decoration that can stay out through January!
Enjoy every ambiance of the Holidays and
Live Life with a Flourish!
Marilyn


