Thursday, June 25, 2015

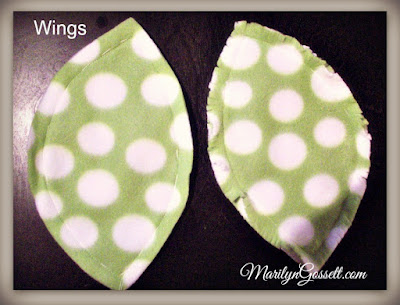
Wing Pattern


Copy and paste pattern onto an 8-1/2" x 11" page.  Pattern should be sized to almost fit page.  Cut out the pattern; place on double thickness of fabric, right sides facing out.  Cut out the wings; pin together. 

 Sew a 1/4" to 3/8" seam allowance.  Snip a fringe into the seam allowance.  Take care to not cut through the stitching.  

Sew a button to the top of each wing.


Wednesday, June 24, 2015

Pocket Pillow Pal to take anywhere!


What is more comfy than fleece and a soft pillow?  I can't really think of anything!  Using a Fairfield pillow made this an easy sewing project that can be completed in an afternoon.


You will need:

* Fairfield Pillow:  Soft Touch Pillow 12" x 22"
* Fleece:  one yard
* Felt sheets:  Turquoise, dark pink, cream, brown, yellow
* Letters:  Alphabet Iron-on letters by JOY  Link:  http://joysa.com/
* Ric-Rac:  Yellow; standard size
* Buttons:  2 white; 2 turquoise
* Sewing machine
* Scissors
* Straight pins
* Needle & thread
* Steam iron
* Fabri-Tac Adhesive (optional)


Directions:

1.  Lay the pillow on the wrong side of the fleece.  Cut the fleece to loosely fit around the pillow and enough for a 5/8" seam allowance.  Leave 6" excess at the bottom of the pillow and enough for a seam allowance at the top.  The fleece casing should be a little loose on the pillow.


2.  Sew a slight curve in the top seam as shown in the photo given.


3.  Cut notches into the seam allowance to allow for stretching.


4.  Wings: Copy, paste and print out the pattern given. 
Click here: http://marilyngossett.blogspot.com/2015/06/wing-pattern.html  Double the fleece with right sides facing out and cut out from the pattern given.  Use the needle and thread to sew a basting stitch 1/4" in from the outside edges.  Stitch over the basting stitches with the sewing machine.  Cut a fringe into the seam allowance taking care not to cut through the stitching.


5.  Eyes:  Cut out the layers from the felt as shown in the photos given.  Cut the notches into the pink and cream circles as shown.


6.  Beak:  Cut a beak on the fold of the yellow felt.  It does not have to be an exact size.  Use the photo given as a guide.  Sew a running stitch below the top fold of the beak.  Layer the circles for the eyes; use the needle and thread to stitch them together.  Anchor them by sewing a button to the center of each eye.


7.  Stitch a button to the top of each wing. 


8.  Pocket:  Use a scrap of fleece for this step.  Measure for the size of pocket you would like to attach to the front of the pillow.  Fold sides under 1" all the way around the pocket and press with steam iron.  Sew a running stitch around the outside edges of the entire pocket.  Stitch the ric-rac to the top edge and to the bottom edge of the pocket.

9.  Heart Pocket:  Make a heart from paper like you did when you were a kid.  (Cut on the fold, then unfold.)  *Should be about 6-1/2" across at the fullest part of the heart.  Cut the cream felt heart slightly smaller.  Cut a 5" heart from the pink felt.  Center the pink felt on the cream heart.  Sew around the edges of the pink heart.  Cut notches in the cream felt heart as shown.  Stitch or adhere to the larger turquoise heart.

10.  Follow the manufacturer's directions to adhere the embroidered letters to the heart pocket.


 11.  Assemble:  Place the pillow in the pillow cover, the seam up the center of the back.  Sew the pillow cover closed along the bottom edge of the pillow.  *Another option is to velcro the bottom closed for easy removal, though I did not do that here.  There should be excess fabric.  Cut into the excess fabric below the stitching, making a fringe as shown.

12.  To finish; I used Fabri-Tac to adhere the eyes, beak, wings and pocket to the pillow casing.  If you are a "purist", you may prefer to stitch everything in place.  Either option will get er' done.


This is a snuggly pillow for kids and adults alike!  I suggest taking it on long car rides or as a companion at naptime.  Coloring books and stickers easily fit in the pocket.  If you leave the heart open on the top and the middle, it can be used as a pocket as well.

Enjoy the rest of the blog hop and see what the other designers have done with these high quality pillows and products from Fairfield.  Just go to the blue Designer Craft Connection button on the sidebar and click to go forward or backward on the hop.

Take time to enjoy the small blessings along the way
and
Live Life with a Flourish!

Marilyn


Sign up here for discounts!  https://www.fairfieldworld.com/


Monday, June 22, 2015

Adorable little faux vanity Gift Box


Faux Vanity Gift Box....for sale in the Etsy Shop.


Box is 2-3/4" square.  Handmade in my smoke-free studio.  I have two in the shop at this time.

The box opens from the top.


Do you like this?  Hop on over to the Etsy shop at the link I have provided.

Thank you for stopping by!  


Take time to enjoy the small blessings along the way,
and
Live Life with a Flourish!

Marilyn

Friday, June 12, 2015

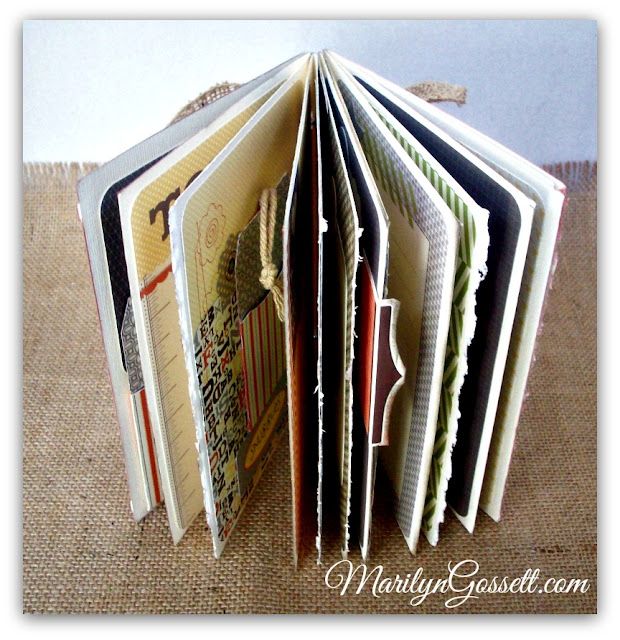
Babycakes Baby Album - for sale in Etsy shop


BABYCAKES BABY BOOK/ALBUM


This original little album has been designed and hand crafted in my smoke-free studio using Close To My Heart "Picture my Life" elements for scrapbooking.  The album is full of pages to write on, places for pictures and little pockets for mementos.  It is a one of a kind and is for sale in my Etsy shop at the following link.   https://www.etsy.com/shop/stuffandthingsandco?ref=hdr_shop_menu

The album measures 6-1/4" x 4-3/4" and is bound with 3 metal rings.  The album comes with the matching holder constructed with the Babycakes memory papers that are no longer in the catalog.  For a closer look at the inside; keep scrolling down!

The product that I used to create the album can be purchased at:  www.marilyngossettdesigns.ctmh.com/retail


Album in coordinating album holder.
Front view of album.
View of album in the album holder.
Pages from beginning to the end.


If you would like to purchase this one of a kind album, head over to my Etsy shop and I will get it right out to you!  There is only one!


Thanks for stopping by!
Make sure to enjoy the small blessings along the way and;
Live Life with a Flourish!

Marilyn


Wednesday, June 10, 2015

Quilt Block Themed Set of Greeting Cards


I have always loved fabric! Memory papers with beautiful graphics came along a few years back!  Now, we can add quilt block themed rubber stamps to the list!  I can't think of an easier or faster way to get the look of fabric than these great stamps and ink pads by designer, Ann Butler.  They are the product of ColorBox and for this challenge, I got to play with some!  Do you see the blue button to the right of this blog post?  It says Designer Craft Connection.  You can go forward or backward by clicking on that button.  Check out what our other designers have created with Ann's stamps and ink on today's blog hop!


Being a visual person myself; I have created this blog post in  a pictorial format.  I will include some text here and there; but most of the creative part can be done by looking at the pictures.  I just love lots of pictures!

Here's what I used:
Ann Butler ColorBox Crafter's Ink:  Canyon; Desert Sand
Ann Butler ColorBox Background Basics Rubber Stamps:  Basket; Flowers; Diamonds; Squares
Wooden Box
Burlap; natural
Cardstock:  White, Vintage White and Black
Paper Trimmer; Scissors
Adhesives
1" Buttons
Wedge sponges and or ink applicators


Now get out your Canyon (red) ink, white cardstock and the rubber stamps.  Ink up one rubber stamp and apply multiple images to the cardstock.  Some of them will show up better than others.  Let the ink dry before you start cutting them out.  Repeat for the other stamped images.


So, there it is!  I think this is a perfect gift to just about anyone.  Hostess, friend, family, etc.  It makes a great "just because" present.  Hope you have enjoyed seeing Ann's stamps on this pictorial today.  "Blog on" and enjoy the rest of the hop!


Enjoy the small blessings along the way and
Live Life with a Flourish!

Marilyn


Here is the link to Ann's website:

Monday, June 1, 2015

"Words of Wisdom" Jar for the Graduate


Need a last minute gift/decoration for the graduation party?  Here is a fun idea that everyone can participate in.  Have slips of paper, ribbon and an ink pen next to this jar.  Ask everyone to write down some thoughts or words of wisdom for the graduate and put them in the jar.  A little money would be nice too!


You will need:

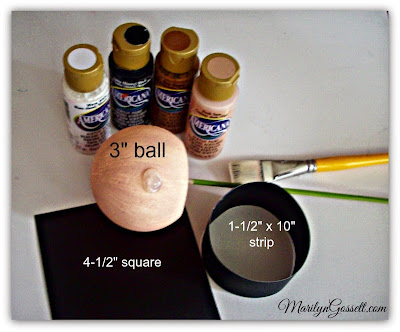
Smoothfoam ball, 3"
Paints:  Fleshtone, Black, Brown and White; Black Chalk Paint
Paintbrushes
Jar with lid (I found one that had an embossed banner on the front in the glass)
Black cardstock
packet of Floss or Craft Thread (I used DMC) in school colors
4" squares of white paper, (pencil to roll them around.)
Black Permanent Marker 
White Marker
Ink Pen
Paper Trimmer
Heat tool or knife to cut Smoothfoam
wooden skewer
glue gun

Instructions:

1.  Refer to the instructions given.  Cut the rounded part from the bottom of the ball leaving a flat surface.
     Using the wooden skewer as a handle; basecoat the ball with fleshtone, then paint the face and hair as            shown.  Paint the embossed sign on the front of the jar with the black chalkpaint.  Let dry thoroughly.
     Write on the chalkpaint with a white marker.  (Write the graduate's name, Jar of Wisdom)

2.  Refer to the instruction sheet given and make a tassel using the floss.  

3.  Hat:  Overlap the ends of the cardstock strip 1" and adhere.  Center and adhere to the cardstock square.
     Place on the head, adhere the tassel to the hat between the cardstock and a 1/2" cardstock circle.

4:  Adhere the head to the top of the jar lid.  Adhere the hat to the top of the head.

5.  Wrap a piece of ribbon around the sides of the jar lid; overlap and adhere the ribbon ends at the back of      the head.


If you have a graduate this year, I wish you all the best!  May he or she go forward in life with much happiness and success!

Take time to enjoy the small blessings in life and
Life Life with a Flourish!

Marilyn

#Smoothfoam  #DMC   #Offray Ribbon   #Cre8time   #Americana DecoArt